Workday Human Capital Management
 | Workday Human Capital Management lets you manage employee records, payroll, recruiting, and workforce analytics in one platform. Integrating with Make enables automated HR data sync, onboarding workflows, and real-time updates between Workday and other business tools. |
|---|
The Workday Human Capital Management app is available on the Make Enterprise plan.
Requirements
To use the Workday Human Capital Management app in Make, you must have an active Workday account with appropriate permissions to access the web services. For subscription, refer to the Workday Human Capital Management pricing page.
Refer to the Workday HCM API documentation for a list of available endpoints.
Get started with Workday HCM
To use Workday HCM with Make, a Workday HCM admin must first complete the following:
Workday recommends using an Integration System User (ISU) to integrate with external services such as Make for the following reasons:
- ISUs carry all operations and documents under the ISU, rather than using a worker specifically for integration and workflow activities
- Integrations using an ISU will not stop working if a worker's security profile changes or they are no longer an employee
- Each ISU can and should be limited to a single integration, such as Make, for security reasons
The ISU must have the mandatory permissions to perform the required actions for your scenario. If you receive an error that states The task submitted is not authorized when building a scenario, the ISU does not have sufficient permissions.
To create an ISU task and configure the ISU account for the integration, follow these steps:
In your Workday account search bar, search for and select the Create Integration System User task.
Enter the following details and click OK.
- User Name - Enter the name of the user. We recommended including ISU in the user name for easy identification.
- Generate Random Password - Select if you want to generate a random password for the user.
- New Password - Enter a password according to the password requirements.
- New Password Verify - Re-enter the password to confirm.
- Require New Password at Next Sign In - Select the checkbox to enable the new password settings on the user's next login.
- Session Timeout Minutes Enforced - This field cannot be edited.
- Session Timeout Minutes - Leave the Session Timeout Minutes as the default value of 0 to prevent session expiration. An expired session can cause the integration to time out before it successfully completes.
- Do Not Allow UI Sessions - This field can be checked as ISUs do not typically require the UI.
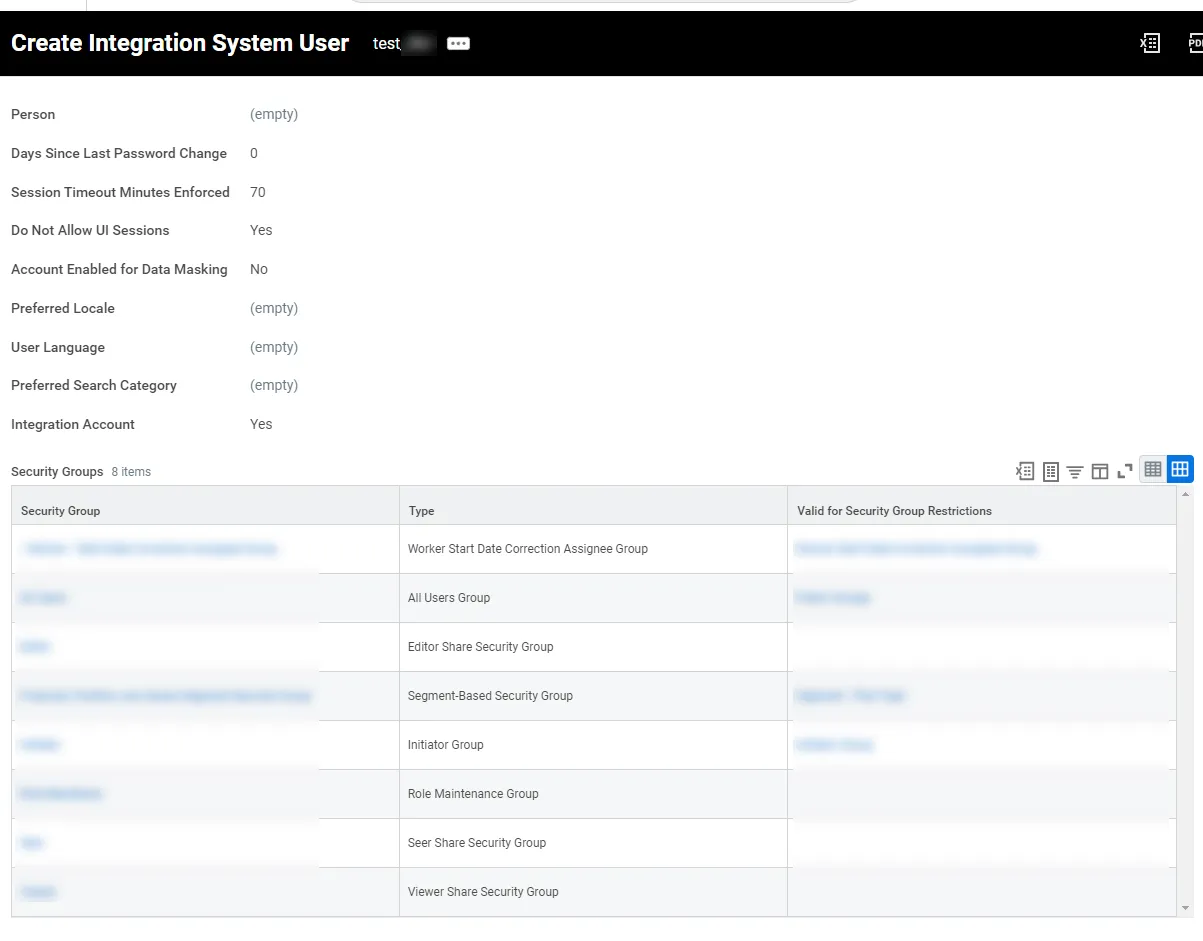
You have successfully created the ISU and a list of security groups are assigned by default. This default list can differ for customer environments specifications.
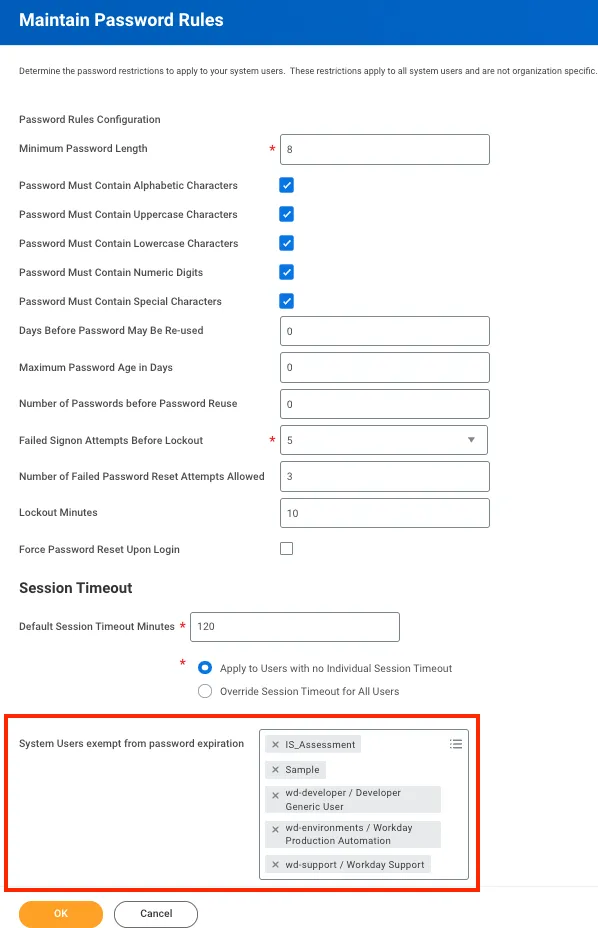
To avoid integration errors due to expired passwords, Workday recommends preventing the ISU password from expiring. Go to the Maintain Password Rules task and add the ISU to the System Users exempt from password expiration field.
To assign the ISSG to the ISU:
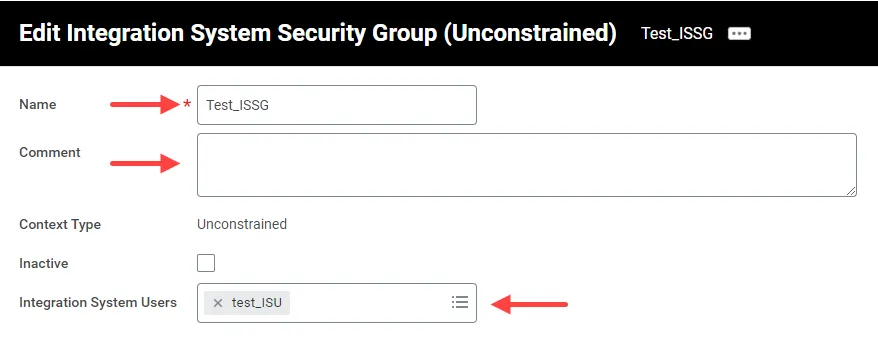
Open the security group created in the above section, enter the following details, and click OK.
- Name - Enter the security group name.
- Comment - Add applicable notes.
- Integration System Users - Select the ISU created in the section above.
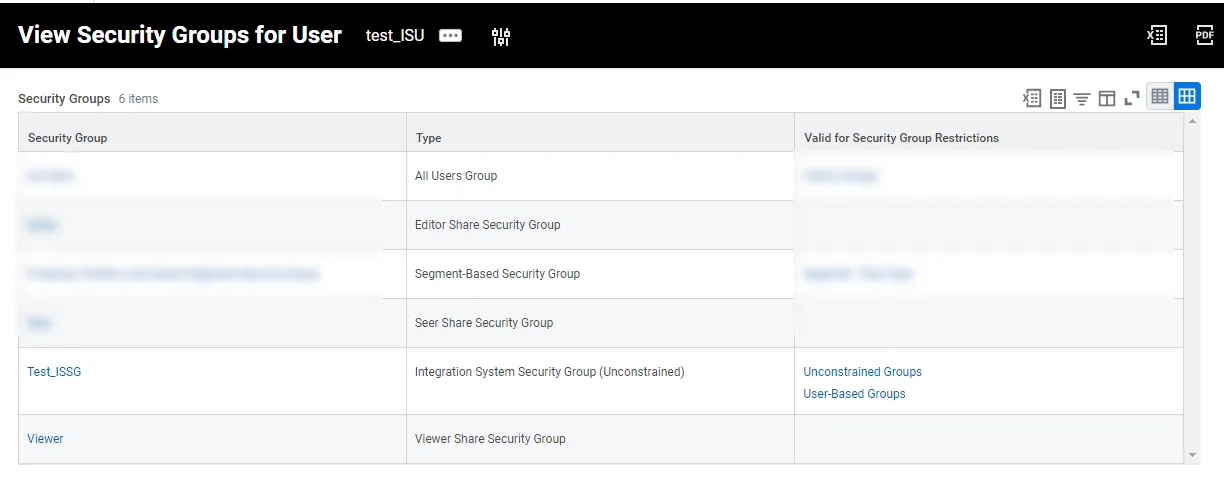
To validate the relation between the ISU and the security group, search for and select the View Security Groups for User task.
In the Person field, select the account and click OK.
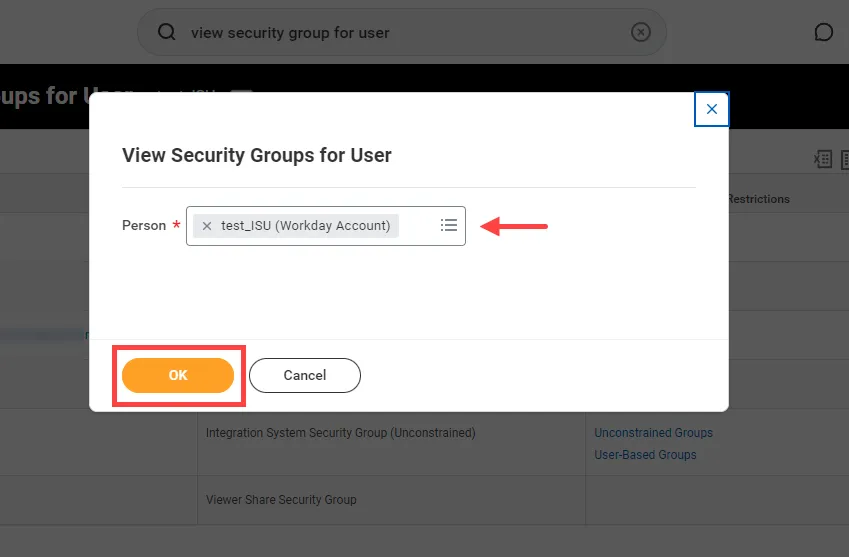
Verify that the created Security Group is now assigned to the ISU.
In this section, you will configure the domain settings for the ISU.
There are several ways to access the Domain Settings screen, Make recommends following the steps defined in this section.
Continue from the Custom report created in the previous section.
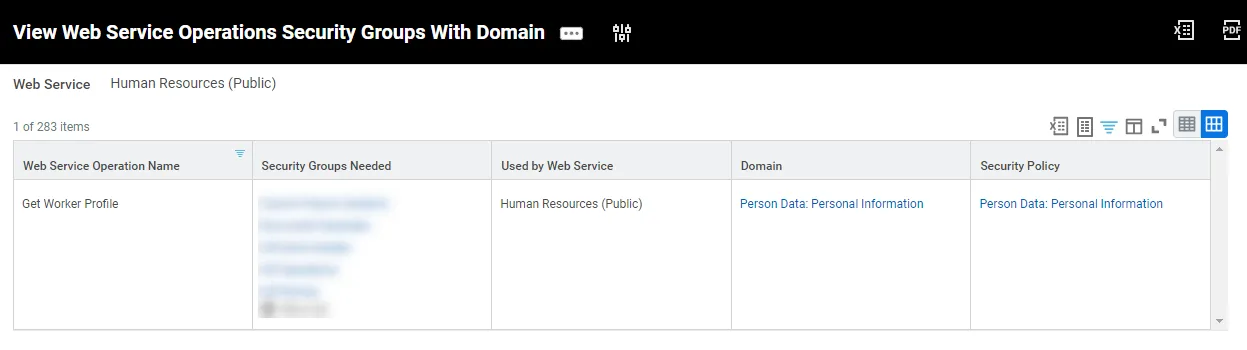
The following screens contain examples for configuring domain settings for Web Service Operation Name, Get Worker Profile based on the Web Service Matrix, Get an Employee module.
Filter the report by Web Service Operation Name and select the relevant domain. For example, Get Worker Profile.
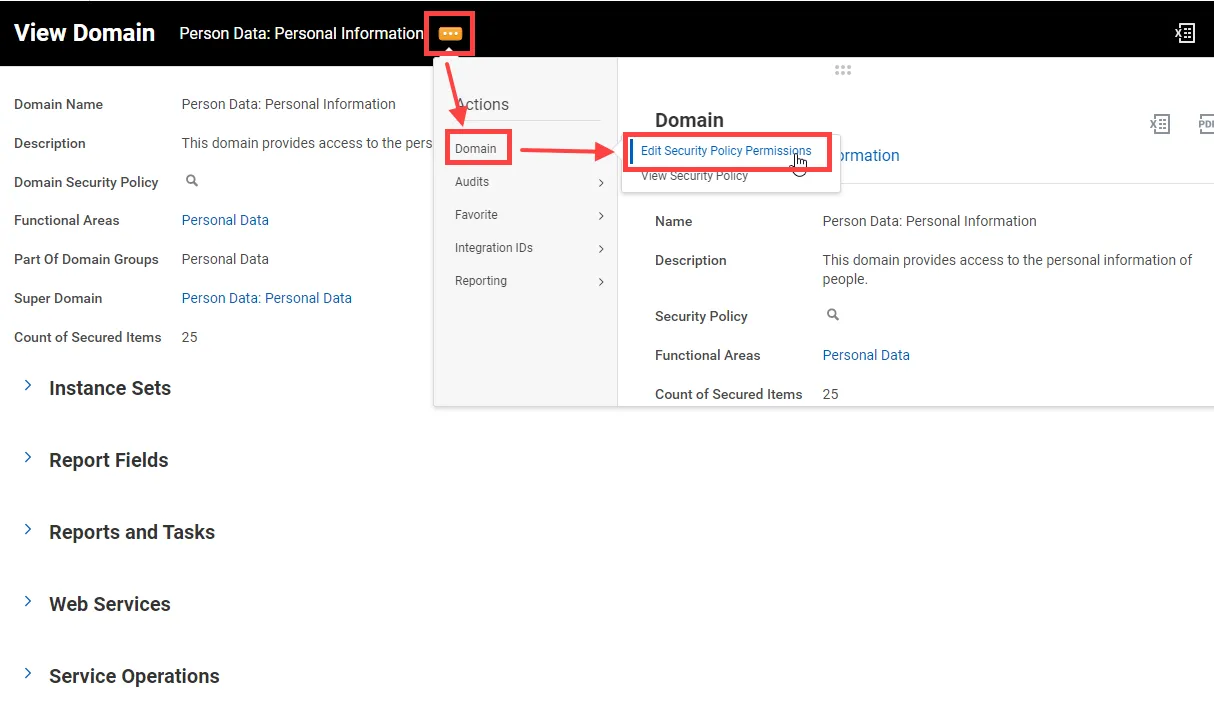
Click the three dots menu > Domain > Edit Security Policy Permissions.
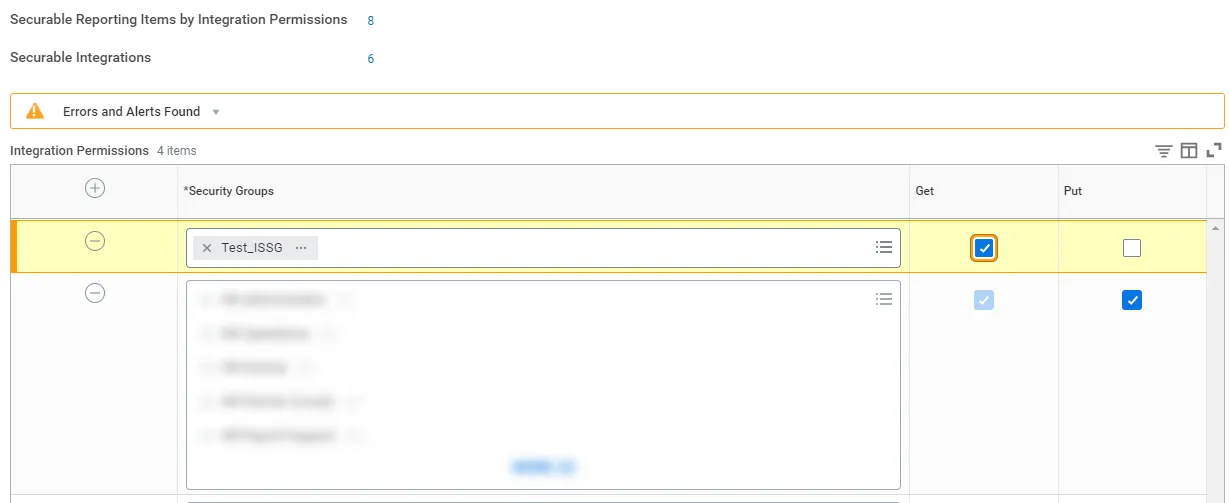
Confirm the action by clicking OK.
Connect Workday HCM to Make
You can establish three types of connection between Workday HCM and Make: with user credentials, refresh token or authorization code.
The System Administrators must thoroughly understand and review their organization's authentication policy and design the integration user based on it.
To establish the connection, you must:
Obtain your Host URL in Workday HCMObtain your Host URL in Workday HCM.
Establish the connection in Make:
Obtain your Host URL in Workday HCM
To obtain a Host URL from your Workday HCM account:
Log in to your Workday HCM account as an admin.
Go to View API Clients.
Copy a Token Endpoint and store it in a safe place.
You've now obtained your Host URL. You'll use the domain part of this value in the Host URL field in Make.
Establish the connection with Workday HCM in Make (User Credentials)
To establish a connection with user credentials:
Log in to your Make account, add a Workday HCM module to your scenario, and click Create a connection.
In the Connection type dropdown, select Workday HCM.
Enter your Host URL Address that you copied above without a trailing slash. For example, https://wd3-services1.myworkday.com for your production instance and https://wd3-impl-services1.workday.com for your sandbox instance.
Enter your Tenant ID. This can be located in your account URL address as follows: https://HostName.workday.com/TenantID/d/home/html.
In the Username and Password fields, enter the Workday HCM login credentials with API access. For more information, see the Getting Started Getting Started section.
Click Save.
You have successfully established the connection. You can now edit and add more Workday HCM modules. If your connection requires reauthorization, follow the connection renewal steps herehere.
Establish the connection with Workday HCM in Make (Refresh token)
Before establishing a connection, your Workday system administrator must complete the steps in the Set up Workday HCM for client credentials and refresh tokens section to generate client credentials and refresh tokens.
Log in to your Make account, add a Workday HCM module to your scenario, and click Create a connection.
In the Connection type dropdown, select Workday HCM (Refresh token).
Enter your Host URL Address that you copied above without a trailing slash. For example, https://wd3-services1.myworkday.com for your production instance and https://wd3-impl-services1.workday.com for your sandbox instance.
Enter your Tenant ID. This can be located in your account URL address as follows: https://HostName.workday.com/TenantID/d/home/html.
In the Client ID and Client Secret fields, enter your client credentials.
Enter the Refresh Token for the connection, provided by your Workday system administrator. Each connection should have its own refresh token as sharing tokens may result in connections being broken.
Workday system administrators can generate tokens in Workday > View API Clients > Manage Refresh Tokens for integrations.
Set the Access Token Expiry in Seconds, provided by your Workday system administrator. This value must be the same as the token expiry settings in Workday.
Click Save.
You have successfully established the connection. You can now edit and add more Workday HCM modules. If your connection requires reauthorization, follow the connection renewal steps herehere.
Establish the connection with Workday Human Capital Management (Authorization code)
Use this connection type when you want Make to access Workday Human Capital Management on behalf of the signed-in user.
Log in to your Make account, add a Workday Human Capital Management module to your scenario, and click Create a connection.
In the Connection type dropdown, select Workday Human Capital Management (Authorization code).
In the Connection name field, enter a name for your connection.
In the Authorization endpoint host field, enter the authorization endpoint host. Host of the Authorization Endpoint, without a trailing slash. For example, https://wd3-impl.workday.com. You can obtain your authorization endpoint host by going to View API Clients → the API client created with Register API Client → Authorization Endpoint in your Workday account.
Redirect URL - https://www.make.com/oauth/cb/workday-hcm4
In the Token endpoint host field, enter the host of the Token endpoint.
Host of the Token Endpoint, without a trailing slash. REST and SOAP use this host. For example, https://wd3-impl-services1.workday.com.
You can obtain your token endpoint host by going to View API Clients → the API client created with Register API Client → Token Endpoint in your Workday account.
Enter your Tenant ID. This can be located in your account URL address as follows: https://HostName.workday.com/TenantID/d/home/html.
In the Client ID and Client Secret fields, enter your client credentials.
Click Save.
Login your Workday account and authorize on the pop up.
You have successfully established the connection.
Set up Workday HCM for client credentials and refresh tokens
Follow these steps in Workday to retrieve the client credentials and refresh tokens necessary to establish a connection.
To generate Client Credentials:
In your Workday account search bar, search for and select the Register API Client for Integrations task.
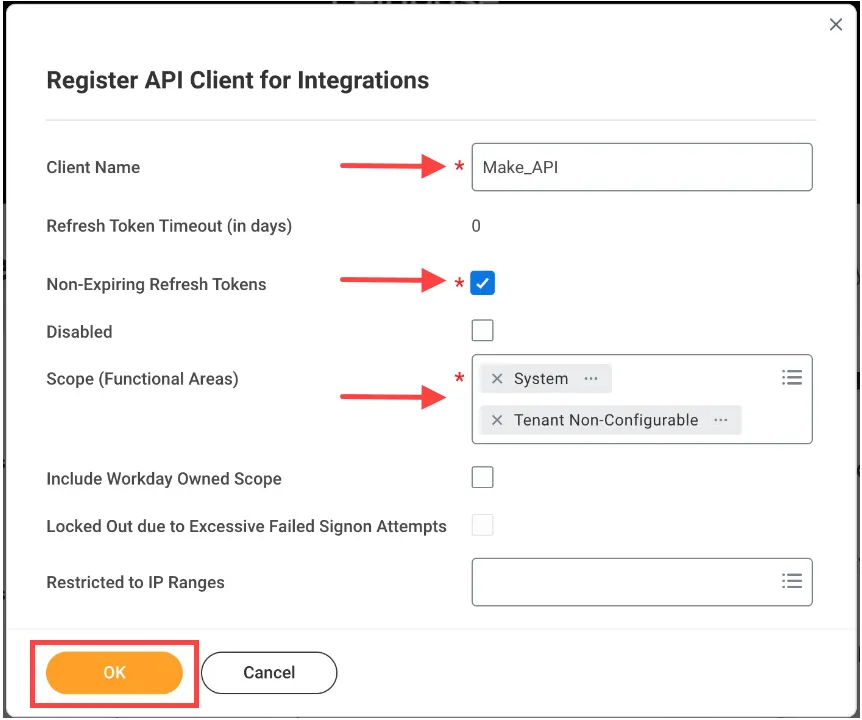
Fill in the Client Name field.
Check the Non-Expiring Refresh Tokens box. This is important to minimize risk of integration down-time. If it is not selected, a new refresh token must be manually created and entered into Make after each expiration.
Add the following Scopes (Functional Areas): System for WQL functionality and Tenant Non-Configurable for RAAS functionality.
Click OK.
Copy the Client ID and Client Secret values and store them in a safe place. This is important as you will not be able to view the Client Secret again after leaving this page and you will be required to generate new credentials.
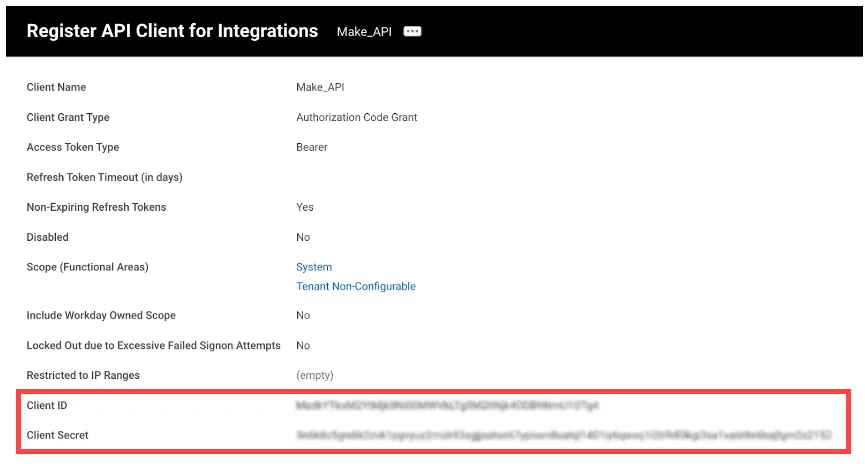
You have successfully created the Client ID and Client Secret to be used when creating the connection in Make.
Configure Refresh Tokens
In your Workday account, go to View API Clients.
Find the relevant API Client and click on ... > API Client > Manage Refresh Tokens for Integrations.
Note: This is also where you can edit API Client scopes, generate new client secrets, and find new refresh tokens if an expiration date was set.
In the Manage Refresh Tokens for Integrations window, enter the Workday Account to be assigned to the API Client. This account must have access to the reports you would like to work with. WQL, RAAS, and SOAP API security is tied to the Workday account.
Click OK.
In the Delete or Regenerate Refresh Token task, click the Generate New Refresh Token box.
Copy the Refresh Token and store it in a safe place.
Note: Each Workday account will have its own refresh token, but can have the same Client ID and Client Secret as other accounts linked to the API client.
You have successfully created the Refresh Token to be used when creating the connection in Make.
Workday Human Capital Management modules
After connecting to the Workday Human Capital Management app, you can choose from a list of available modules to build your scenarios.
Templates
You can look for more templates in Make's template gallery, where you'll find thousands of pre-created scenarios.
Workday Human Capital Management resources
You can have access to more resources related to this app on the following links