MCP Client
The MCP Client app is available in Open Beta to all users. As a beta feature, both product functionality and pricing may change.
The MCP Client app in Make connects you to remote MCP (Model Context Protocol) servers and their tools. Each MCP server hosts a collection of tools that you can use in your scenarios. When you set up an MCP Client connection, you gain access to all the tools available on that server. The app handles the communication — it sends your requests to run the remote server's tools and brings back their responses. You can map data from your scenario to these tools and use their outputs.
The MCP Client app displays all available tools from your connected server, along with clear information about which fields are required and which are optional.
Key benefits
- OAuth supported: Securely connect to remote MCP servers without exposing credentials
- Verified server selection: Select a verified MCP server easily or enter a URL manually
- Dynamic tool access: Instantly see which tools are available and what inputs they require
- No manual setup required: Connect to tools without the manual configuration needed for HTTP modules
- Enhanced AI capabilities: Give your AI agents access to new tools by connecting them to MCP servers
Connect MCP Client and Make
To get started, you must first create a connection between the remote MCP server and Make, allowing the two services to communicate.
Make supports a list of verified remote MCP servers, with their server URLs prefilled in the connection window or included in the Verified remote MCP servers list below. If you would like to connect to a remote server that is not on the list, you'll need to obtain the server's URL.
To create the connection, you need to:
Create the connection in Make
To create the connection:
Log in to your Make account, add the MCP Client module to your scenario, and click Create a connection.
Optional: In the Connection name field, enter a name for the connection.
In the MCP Server field, select one of the verified remote MCP servers, or click + New MCP Server to connect to a server not on the list.
If you selected a remote MCP server from the list, the URL field will be prefilled with the necessary information. If you selected + New MCP Server, see the Obtain the URL of the remote MCP server section below for information regarding how to find the URL, then enter it in the URL field.
Some remote MCP servers require an access token, API key, or other type of credentials.
If you selected a remote MCP server from the list, any additional fields will appear below the URL field for you to enter the value. If you do not see any additional fields, you can skip this step.
If you entered the URL manually and it requires an API key or access token, enter the necessary value in the API Key / Access token field. If the server doesn't require one of these values, you can skip this step.
Some MCP servers may require you to set up a redirect URI for OAuth connections. If requested, add the following redirect URI in your MCP server settings: https://www.make.com/oauth/cb/mcp
Click Save.
If prompted, authenticate your account and confirm access.
You've successfully created the connection and can now use the MCP Client app in your scenarios. If you want to make changes to your connection in the future, follow the steps here.
Optional: Obtain the URL of a remote MCP server
To connect to a remote MCP server that isn't included in the MCP Server dropdown list in Make, you'll need to obtain the server's URL. You can review the list of servers in the Verified remote MCP servers section below, or the PulseMCP website is a recommended source for available remote MCP servers and their URLs.
Make provides its own MCP server for direct integration between your scenarios and AI systems such as AI assistants and agents.
Make's server URL is: https://mcp.make.com
You can visit the Make Developer Hub for more information.
MCP Client modules
After connecting to the MCP Client app, you can use the following types of modules to build your scenarios.
Actions
Uses AI to execute a task by selecting and running the required MCP tools.
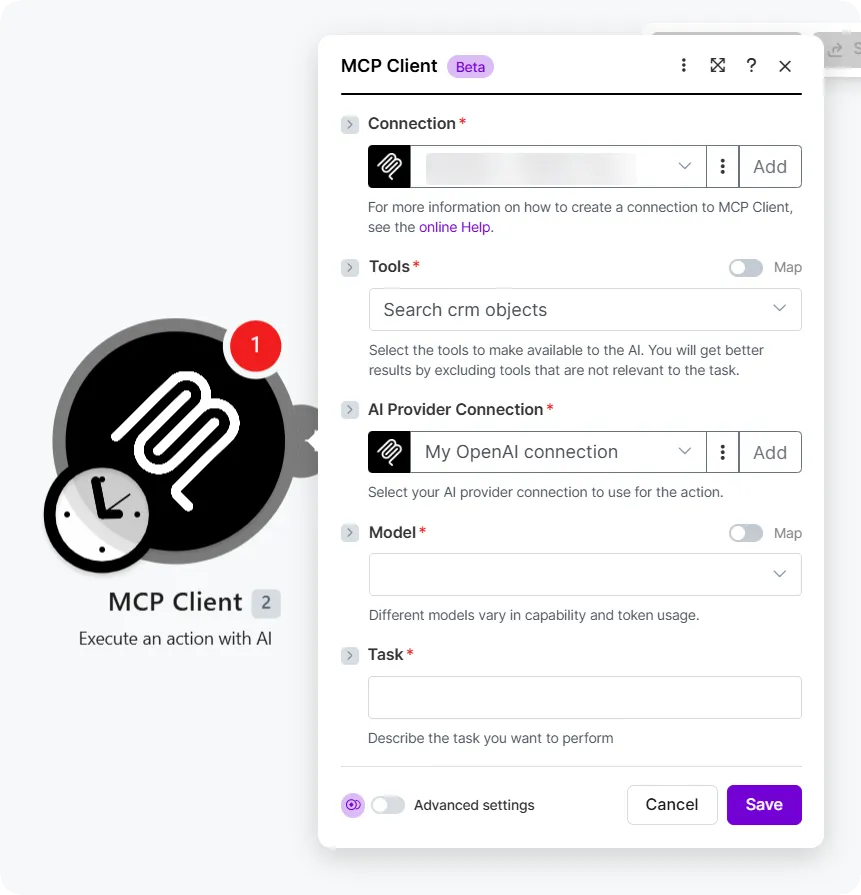
Field | Description |
|---|---|
Connection | Create a connection to your remote MCP server. Create a connection to your remote MCP server. |
Tools | Select the tool(s) to make available to the AI. For optimal results, exclude tools that are irrelevant to the task. |
Connection type | Select from the supported AI providers to create a new connection:
|
AI Provider Connection | Connect using your AI provider's connection for the action. |
Model | Select the AI model to use for this action. Available models depend on the connected AI provider. Models vary in capability and cost:
|
Task | Describe the task you want the AI to perform. In advanced cases, you can add a custom system prompt after the task description to guide the AI's approach to the task. |
Disable system prompt | By default, the AI follows Make's system prompt. Select Yes if you want to disable it, then add your custom system prompt to the Task field. |
Searches
Request an MCP server to execute the tool with the given name.
This module is recommended for testing a server before using the Execute an action with AI module.

Field | Description |
|---|---|
Connection | |
Tool Name | Select the tool to run. |
Arguments | Enter (map) the required and optional input fields of the selected tool. |