Module Migrator
Module Migrator is a standalone app designed to address breaking changes and automate the migration of deprecated app modules to their latest versions. It eliminates the need for manual scenario updates or skips identifying what the breaking changes are. The Module Migrator reduces effort, accelerates the migration and adoption of new features.
Migration is not supported for all apps. You can view the full list of currently supported apps in the Module Migrator itself.
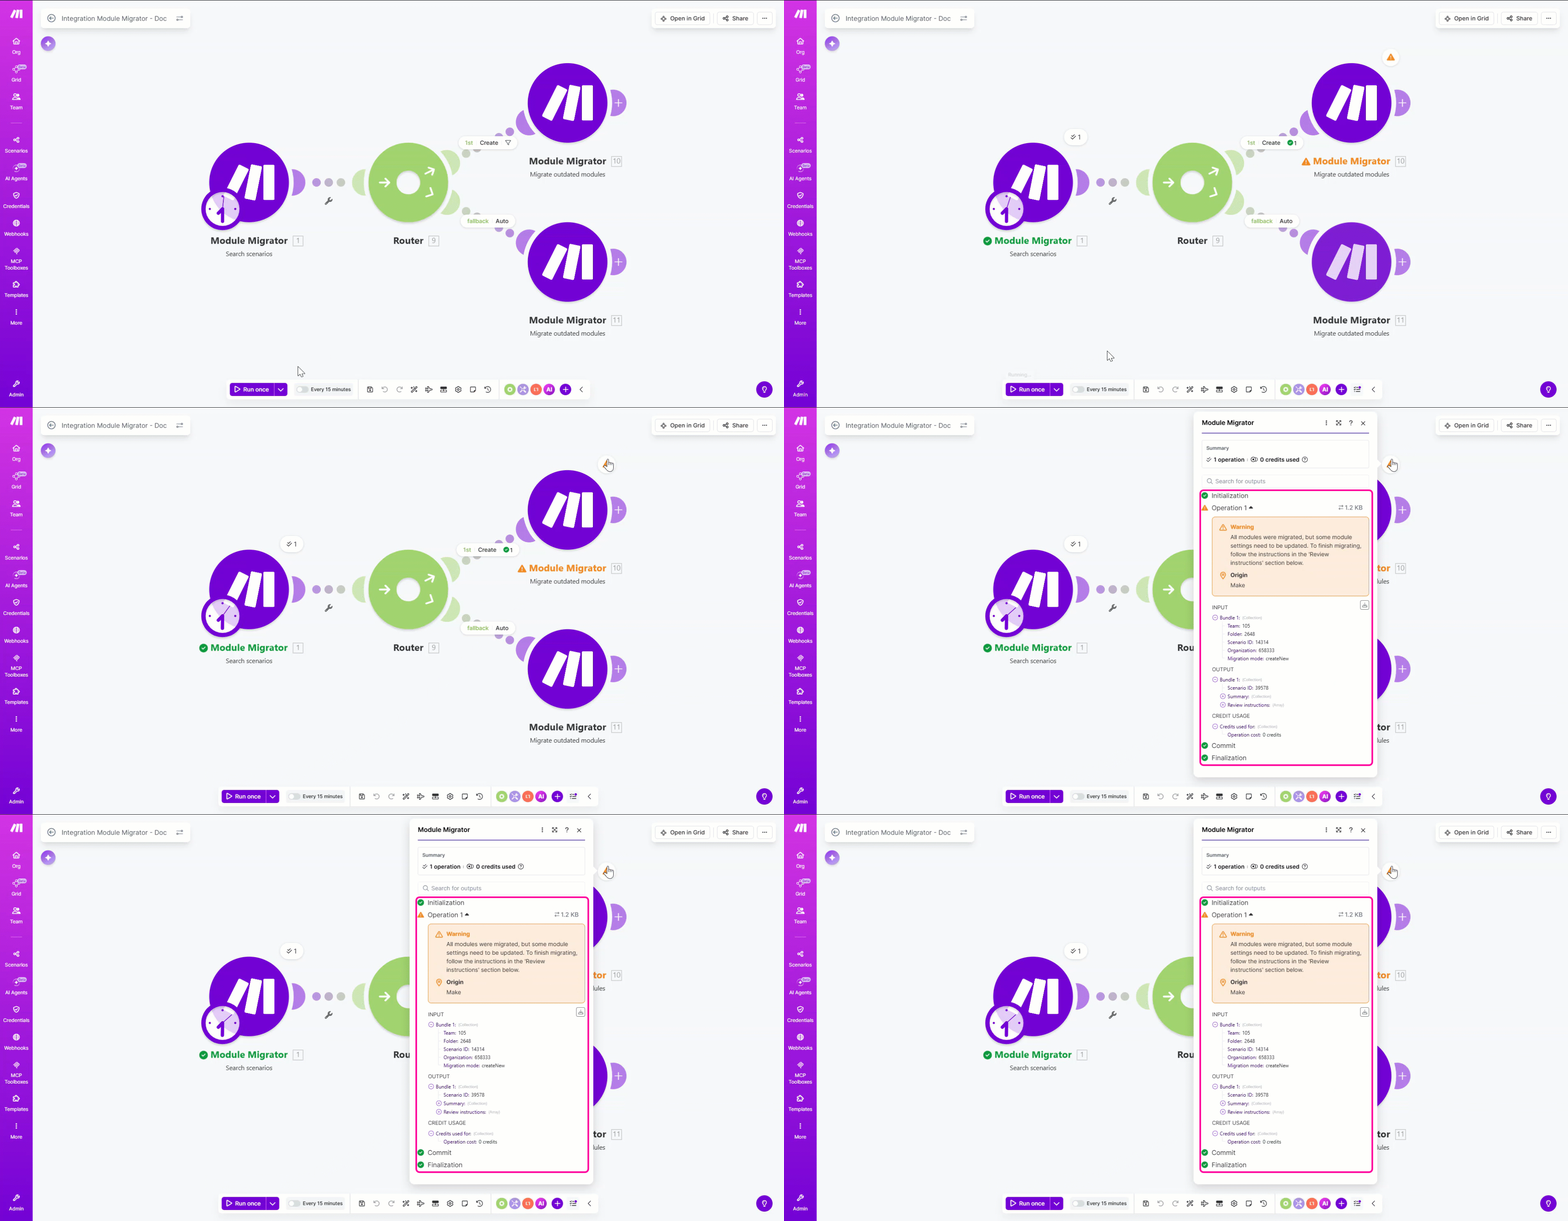
Certain complex configurations require manual intervention. In these instances, the module provides specific guidelines to help you complete the migration successfully.
Key benefits
- Scalability: Automatically updates multiple scenarios at once.
- Provides clarity: For risky scenarios, the Module Migrator minimizes user struggle to identify exactly what changed between versions and how to map old configurations to new ones.
- Simplifies complexity: Eliminates human error due to manual migration.
Flexible module migration processes
Safe recreation
The safe recreation method is a "safety-first" workflow, allowing users to transition to updated module versions without risking the integrity of their current production environment. Instead of applying changes directly to the live scenario, this method generates an independent clone of the original scenario.
During the replication process:
- Module Migrator intercepts the legacy modules and replaces them with their updated counterparts.
- Remaps parameters and adjusts for breaking changes in the background.
- You are prompted to select a designated destination folder for this new version, to separate it from the original.
How to use it: Select the Create a new scenario option in the Module Migrator > Migrate outdated modules.
Direct update
In this method, you can update your scenarios instantly without the overhead of managing duplicate files. The system scans the existing scenario, identifies the outdated components, and overwrites them with the latest versions directly within the original scenario. It automatically maps the old configurations to the new module structure and updates downstream dependencies in real time, ensuring the scenario is ready for immediate use.
How to use it: Select the Update original scenario option in the Module Migrator > Migrate outdated modules.
Things to remember
- For scenarios with polling triggers - If the recreated scenario starts with a polling trigger, you must select the first record to run from (by date, ID, from now on, etc.), then activate the new scenario and turn off the original scenario.
- For scenarios with instant triggers - If the recreated scenario starts with an instant trigger, you must switch the webhook - which means, you must unlink it from the original scenario and select it in the new scenario. In case of recreating a scenario with instant trigger, the webhook is removed in the copy, so the original scenario remains functional.
Create a connection with the Module Migrator app
Make provides two ways to connect to the Module Migrator app:
- OAuth2
- API key
To create the connection using OAuth2, continue to the Create the connection in Make section.
To create the connection using an API key, you need to obtain your API key in Make.
Obtain your API key in Make
If you are connecting using an API key, you should first obtain an API key in your Make account.
To obtain the API key:
Log in to your Make account.
Click Profile Icon > Profile.
Click on the API tab. If there is no existing API key, create one by clicking Add token. If there is an existing API key, go to step 5.
Add the label and scopes for your token and click Save.
Use the following scopes - organizations:read, teams:read, scenarios:read, scenarios:write, and connections:read
Copy the API Key value and store it in a safe place.
You'll use this value in the API key connection field in Make.
Create the connection in Make
To create the connection:
Log in to your Make account, add a Module Migrator module to your scenario, and click Create a connection.
Select your Connection type: OAuth2 or API key.
Optional: In the Connection name field, enter a name for the connection.
In the Environment URL field, enter the URL address of your Make instance. For example https://eu1.make.com.
If you selected API key as your Connection type, enter your API key in the API key field.
Click Save.
If prompted, authenticate your account and confirm access.
You've successfully created the connection and can now use the Make app in your scenarios. If you want to make changes to your connection in the future, follow the steps here.
Module Migrator modules
Example scenario before and after migration for direct updates
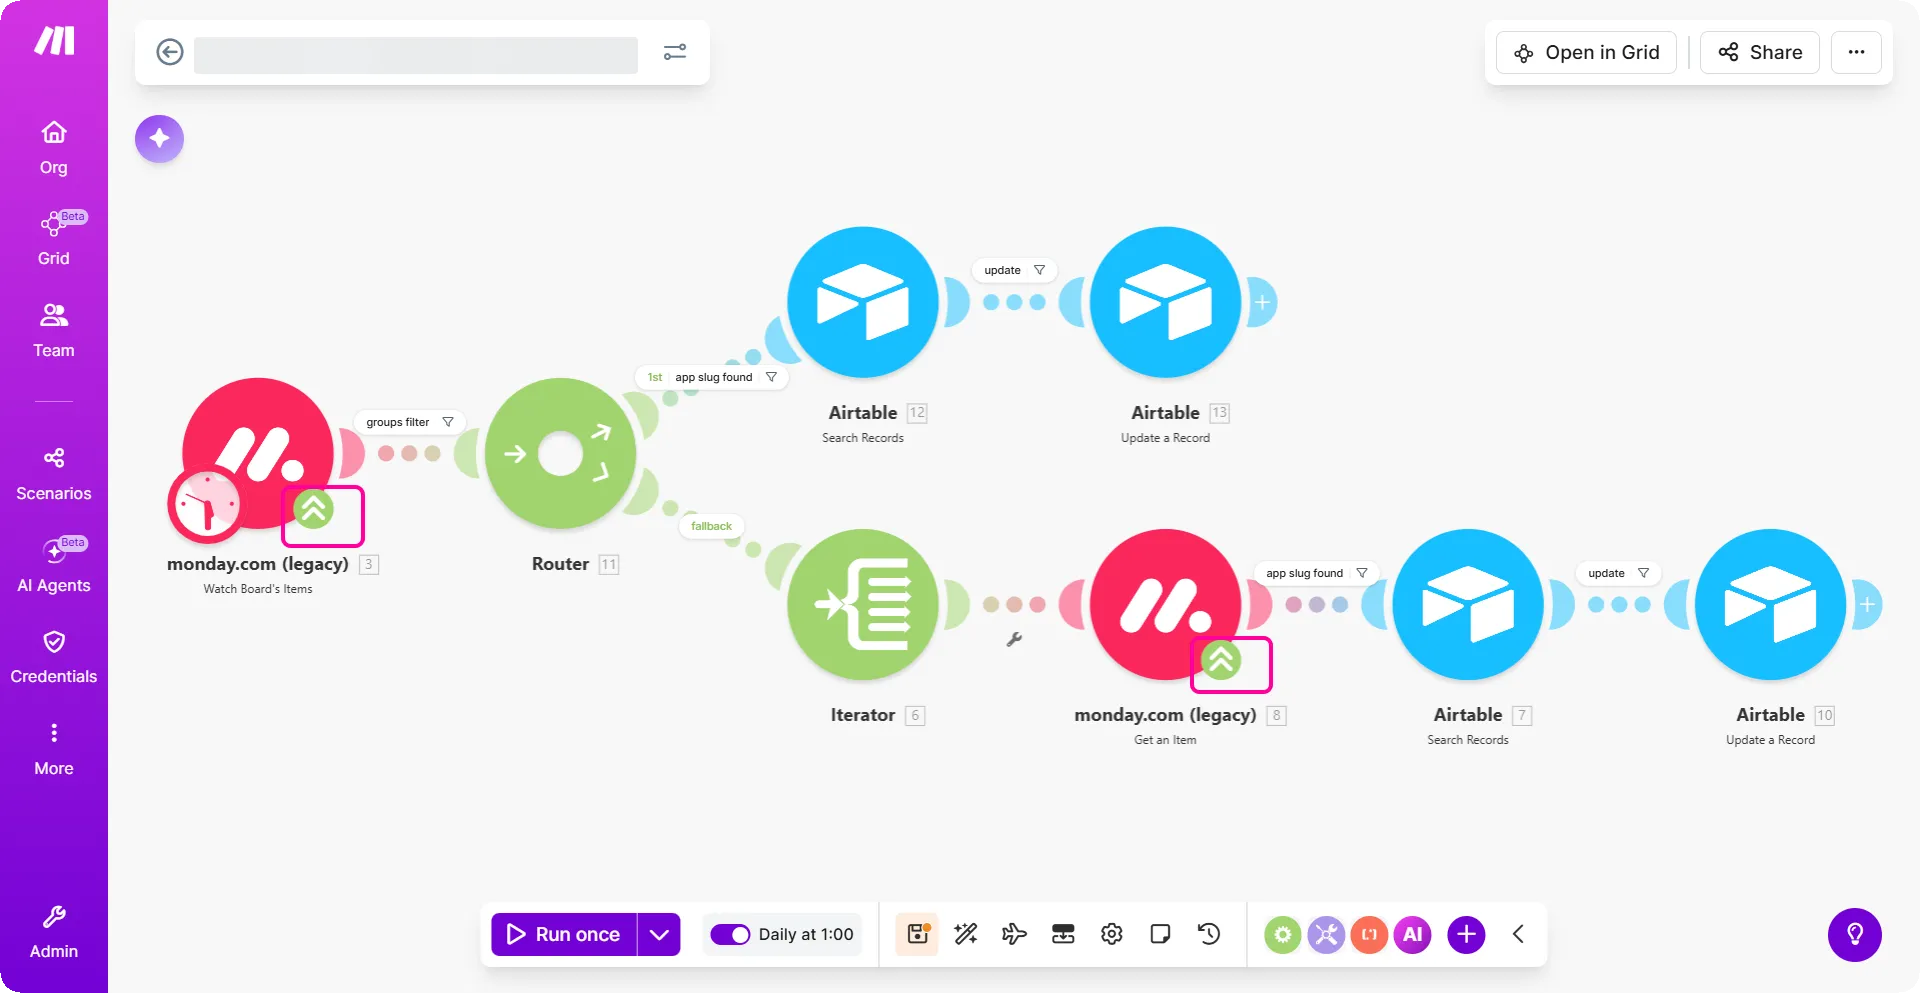
- Scenario before migration:
The scenario below contains deprecated modules marked with green arrows. The direct update method allows you to update a scenario by overwriting legacy modules with their latest versions instantly.
- Scenario during migration:
When you run this scenario, the Search scenarios module scans for scenarios that need updates. The Migrate outdated modules module returns a warning with instructions if a module update involves additional manual steps. Modules eligible for a direct update are replaced immediately.
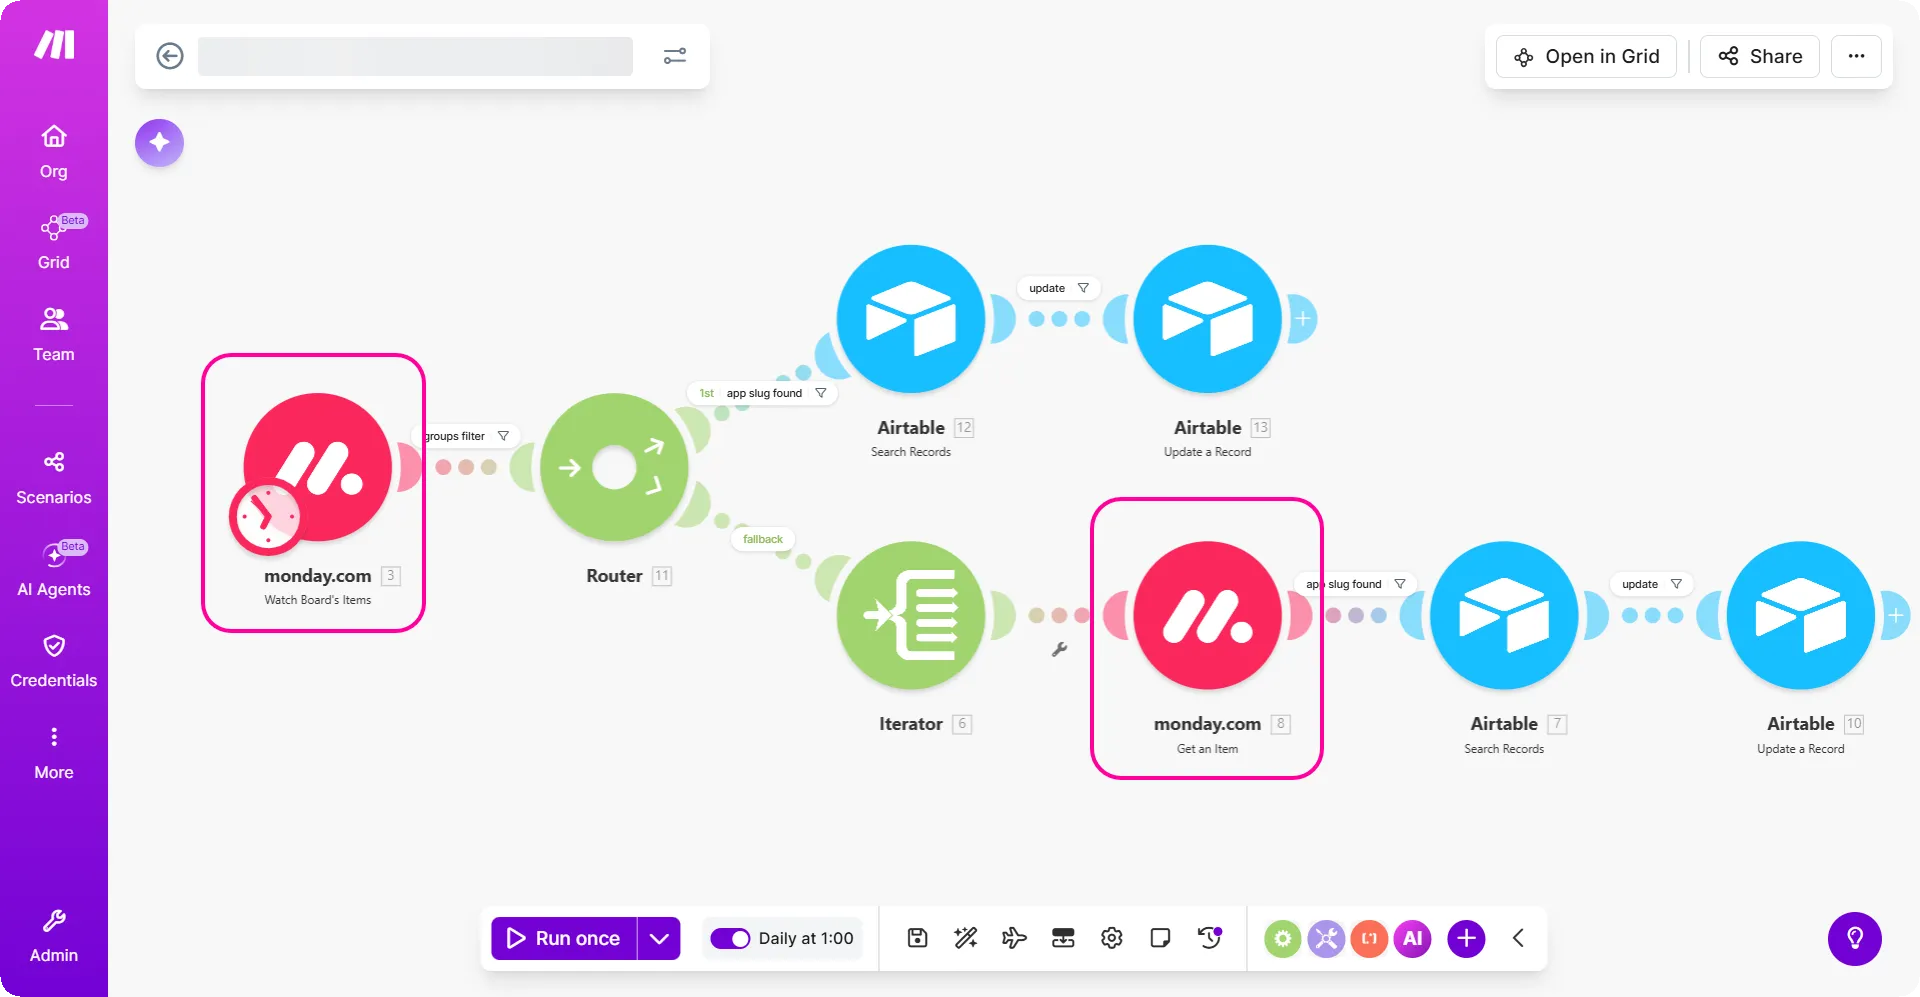
- Scenario after migration:
You will see that all deprecated modules have been replaced by their updated versions.
How to use the Module Migrator
Updating legacy modules across multiple scenarios can be a complex task. This procedure guides you through building an automated workflow that identifies deprecated modules and migrates them using either a Safe Recreation path (for complex scenarios) or a Direct Update path (for simple, low-risk scenarios).
Step 1: Search for the scenarios that need migration
Use the Search scenarios module to identify which scenarios need migration.
Log in to the Make platform.
Add a Module Migrator > Search scenarios module to your scenario builder.
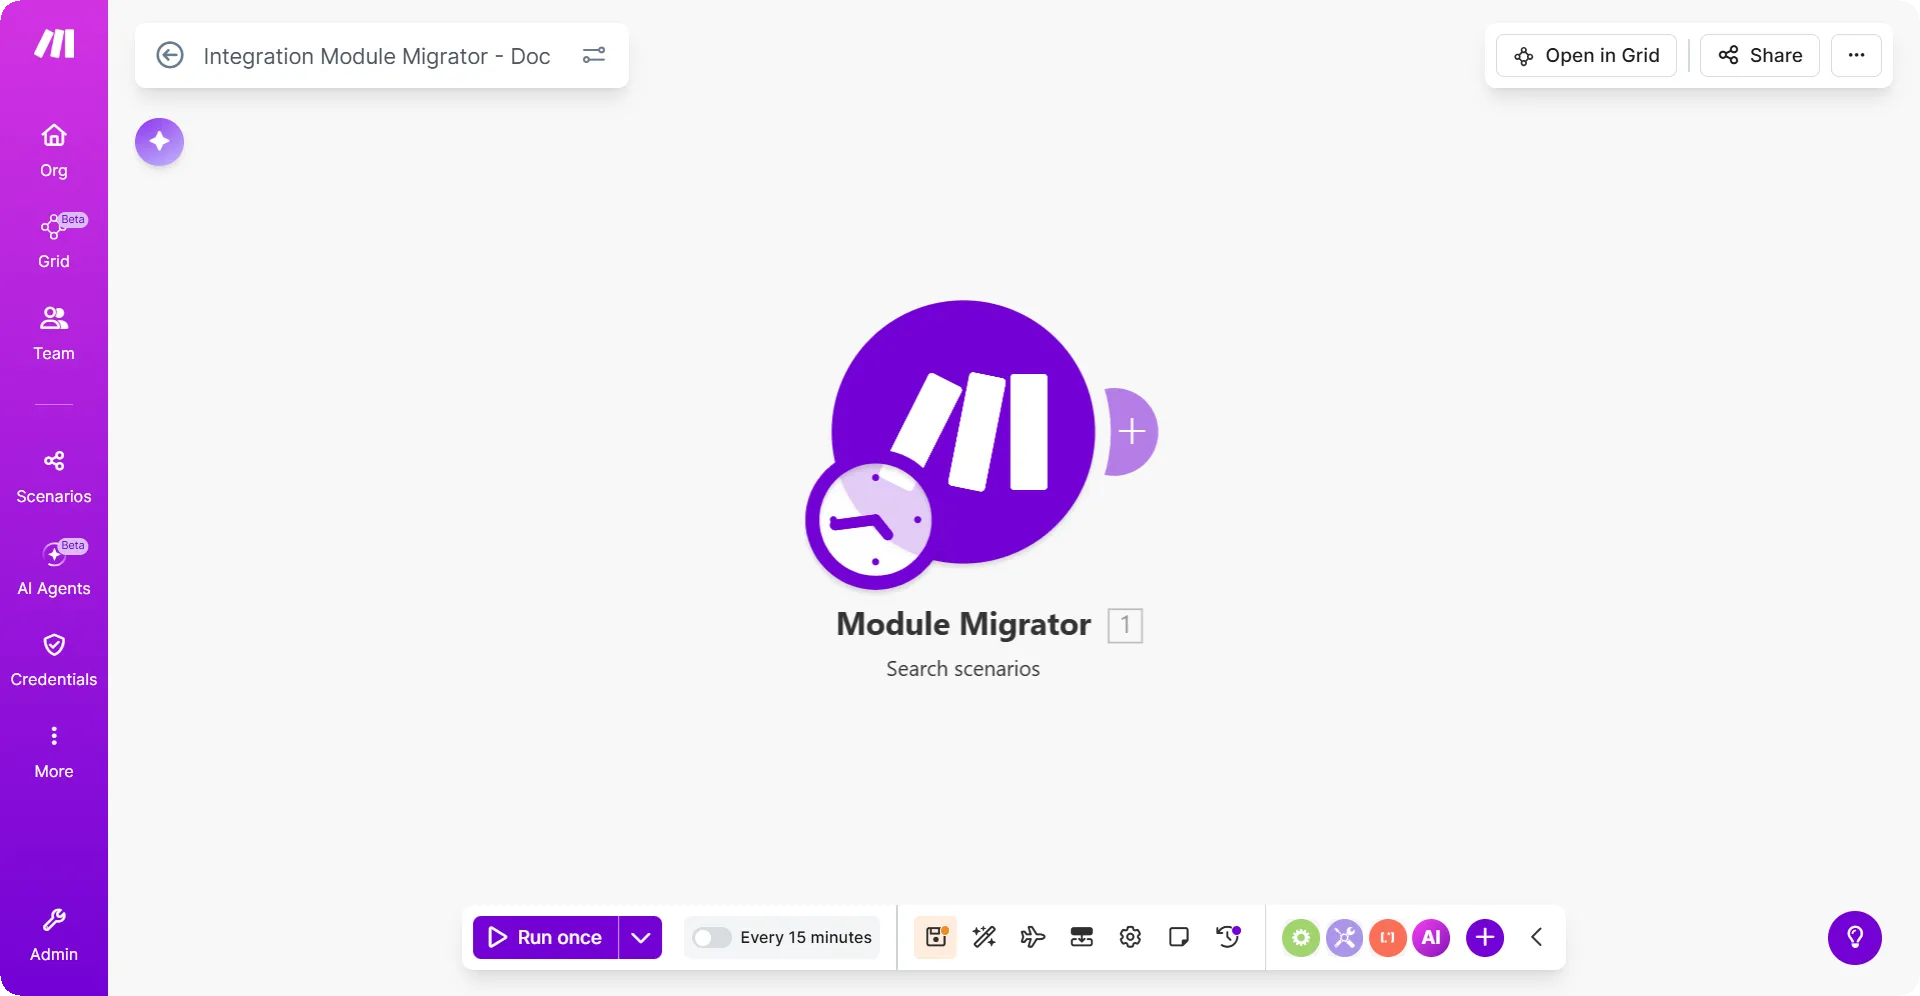
In the Connection field, select an account to connect or create a new connection using OAuth or API keys.
From the Folder dropdown, select the folder in which the scenarios are saved.
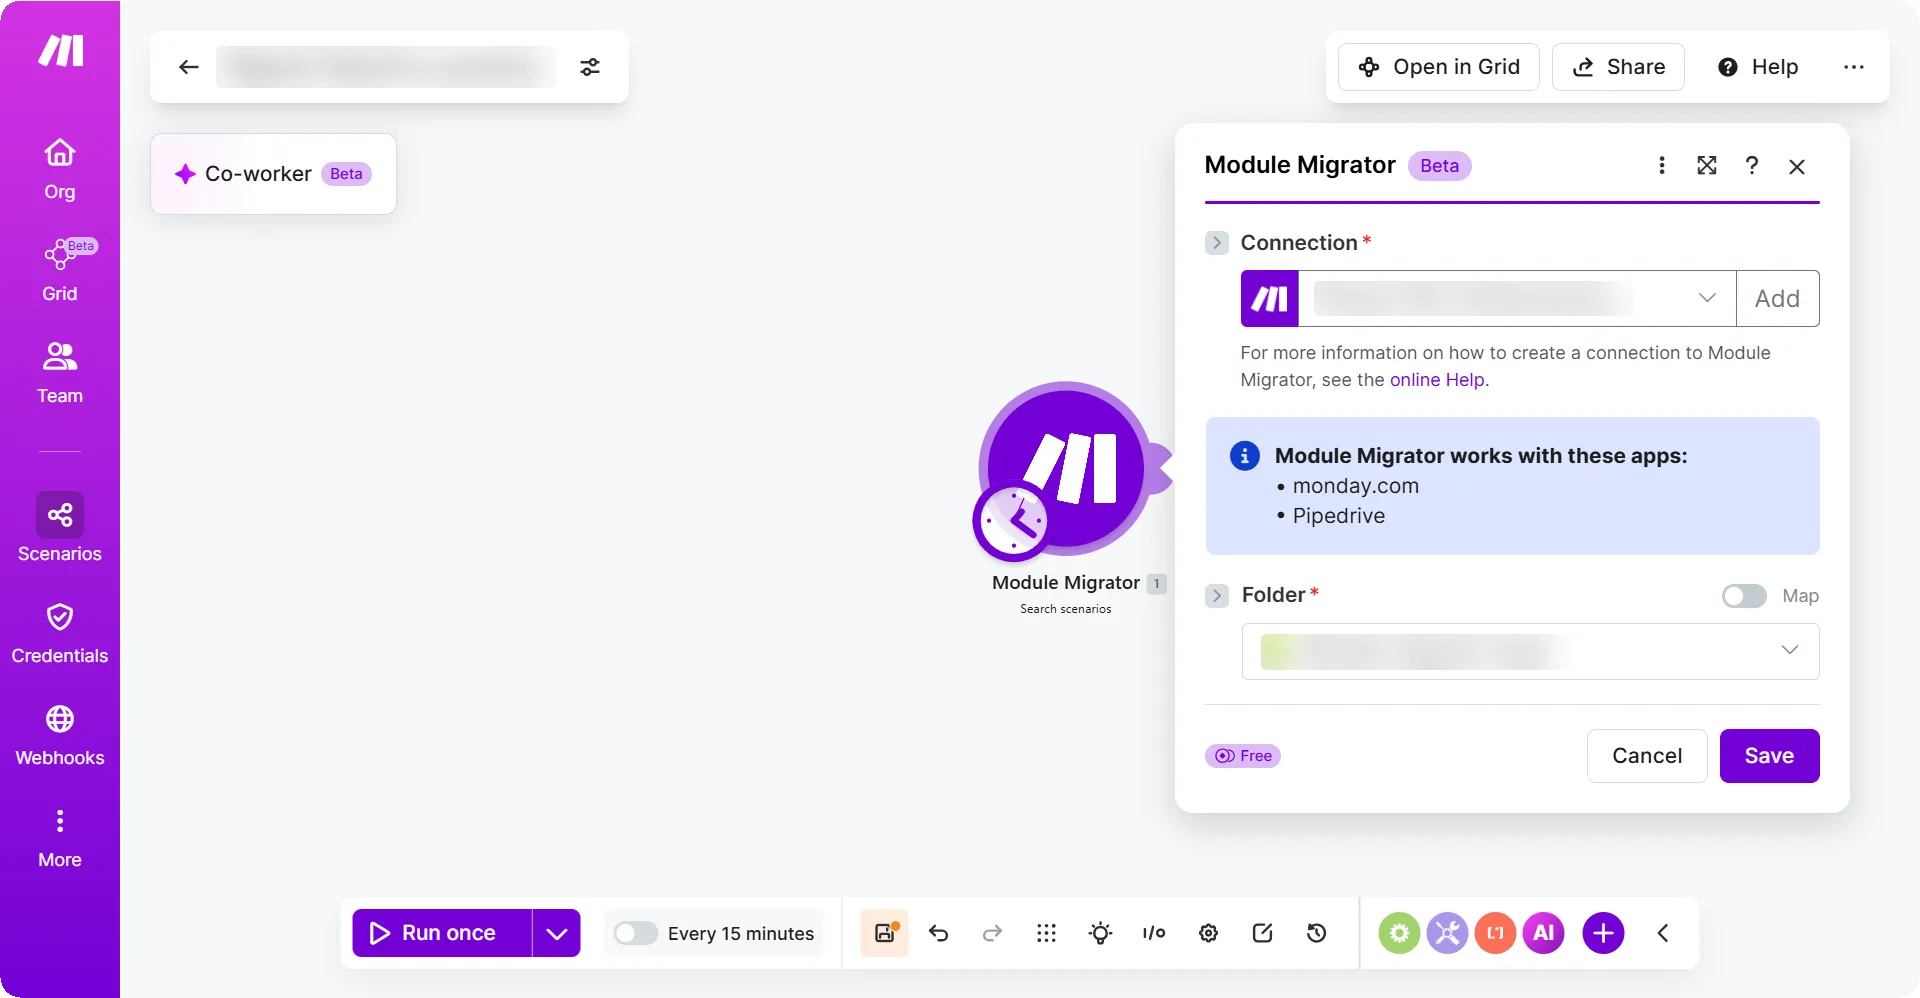
Click Save.
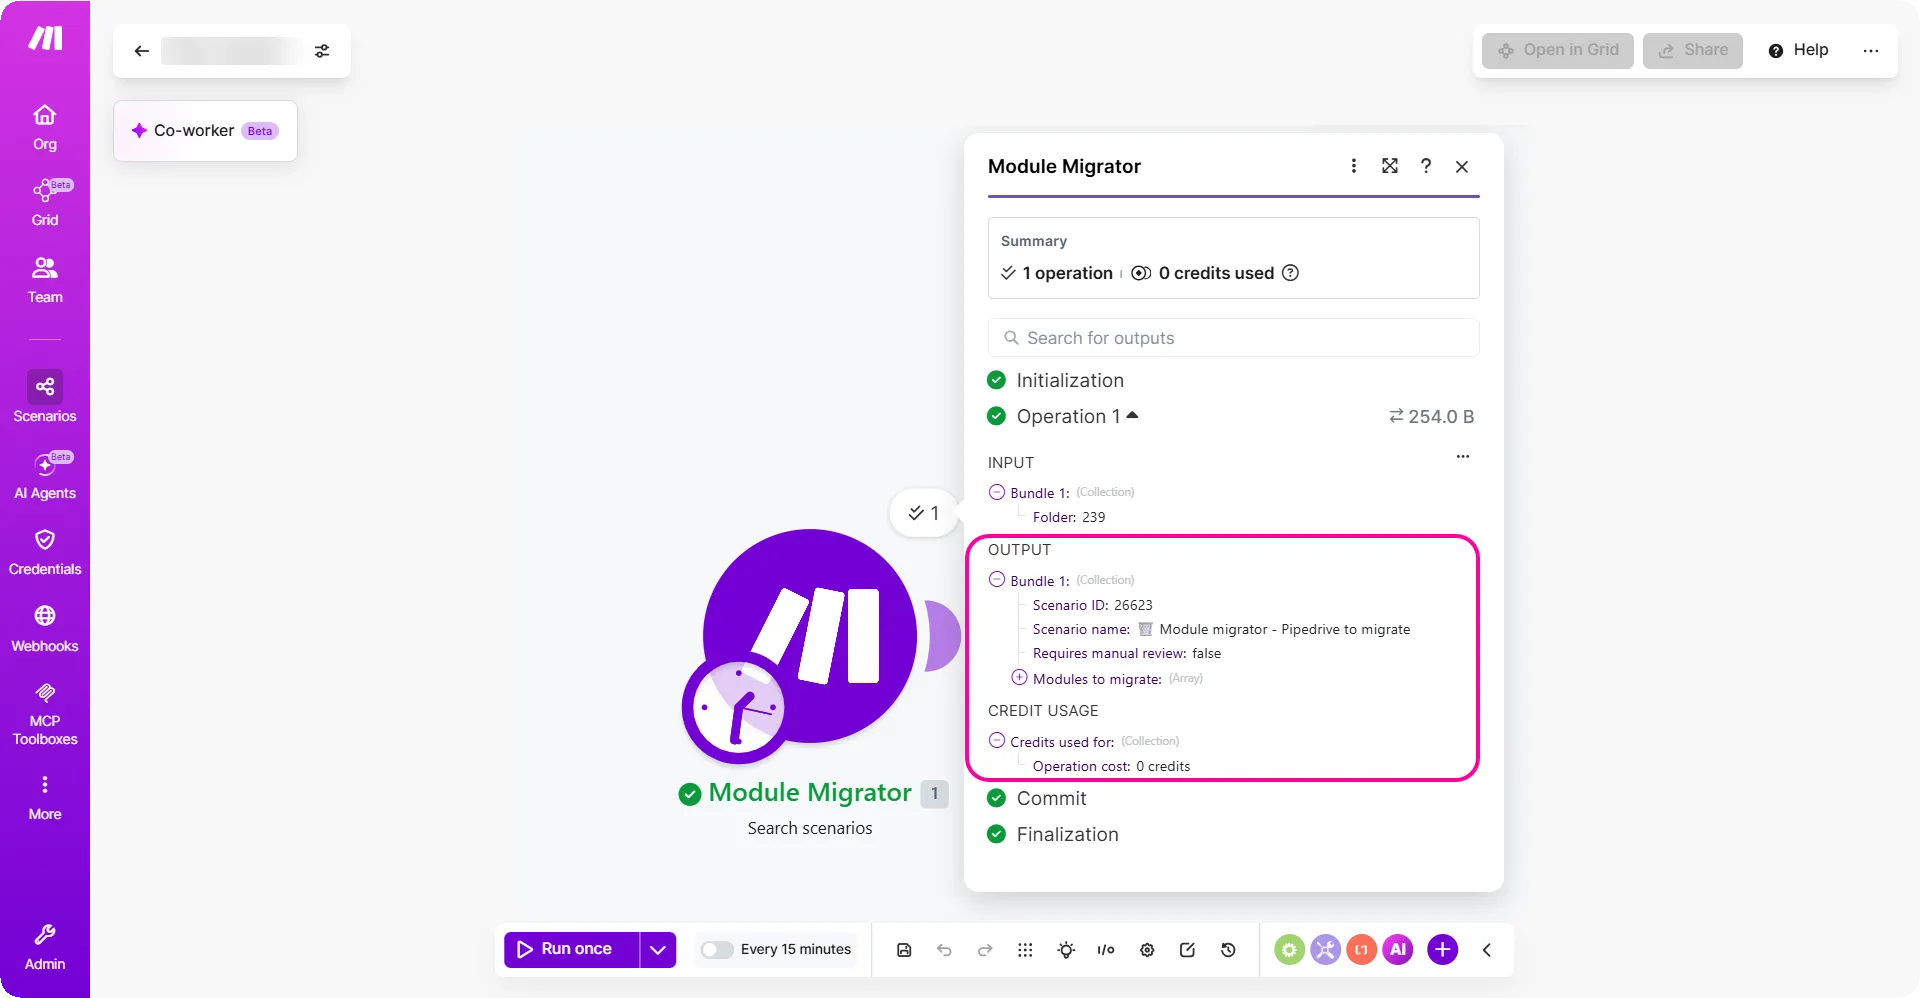
When run, this module outputs a bundle that shows the old and new module names and whether updates are needed.
Step 2: Add a router to route the scenarios for migration.
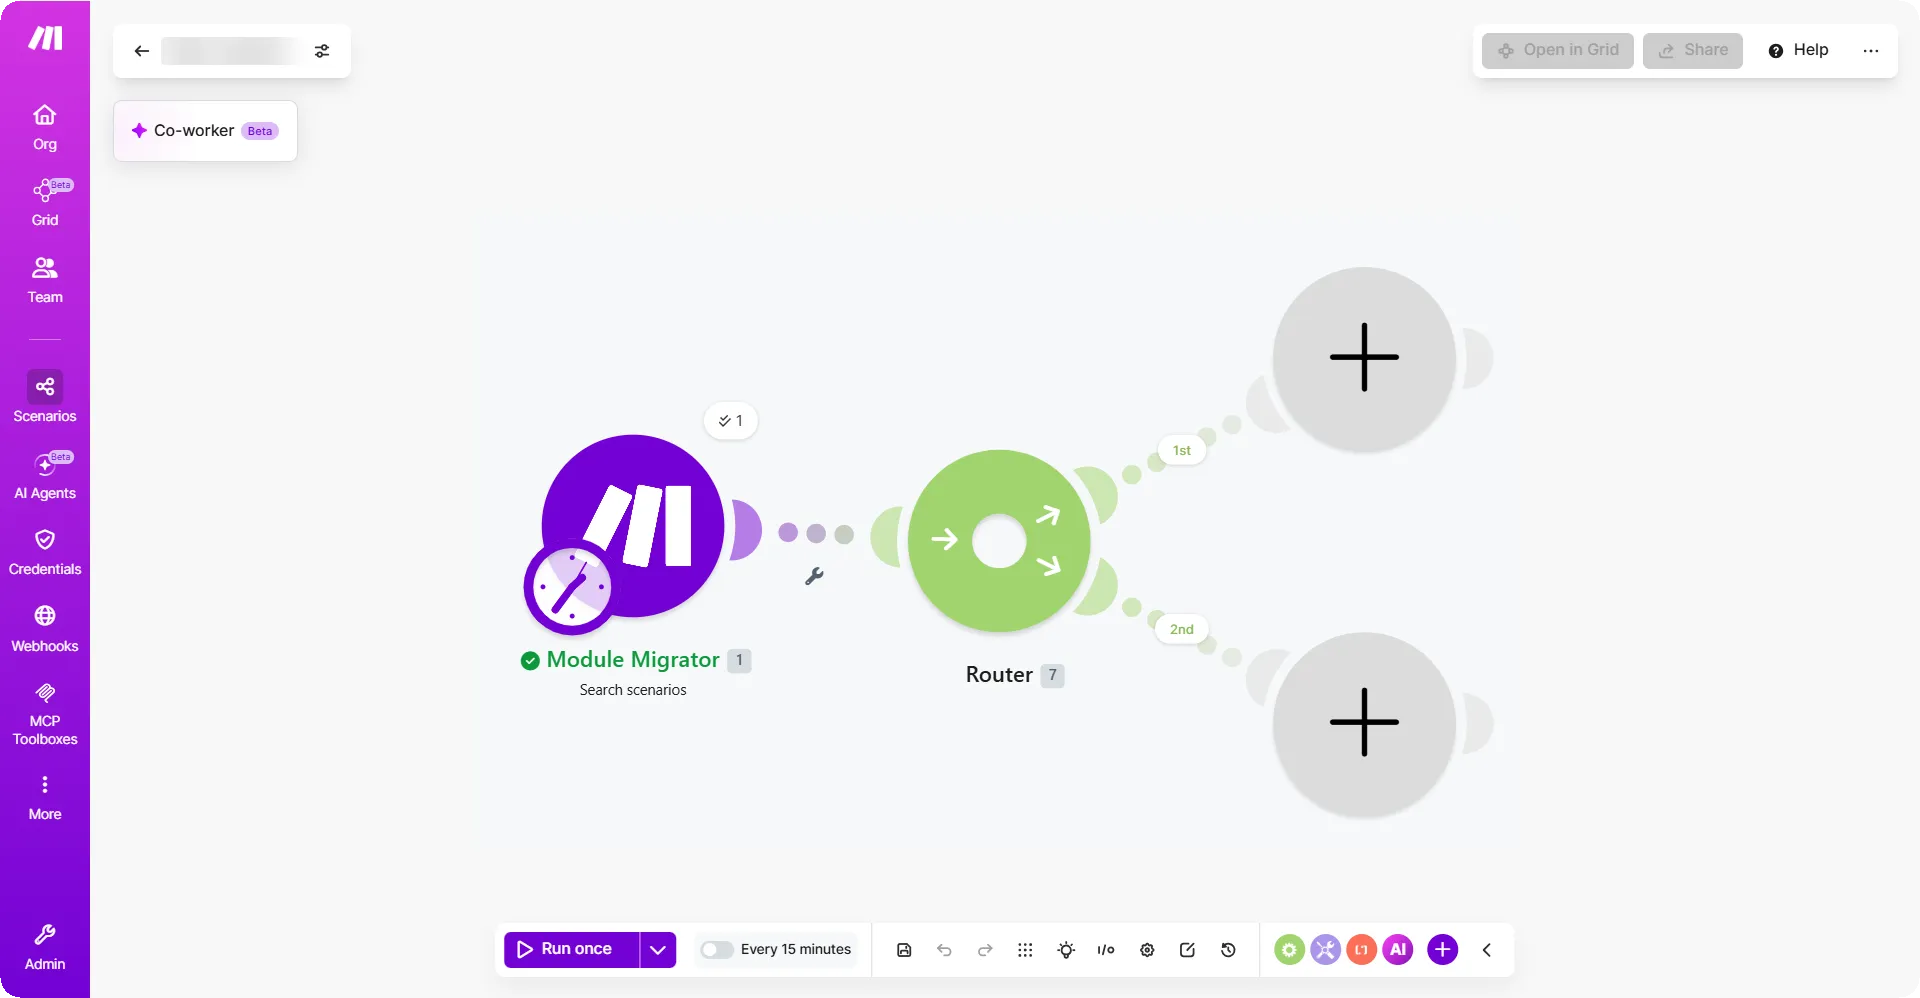
In this step, you will add a router to route the scenarios that need manual updates and those that can be overwritten.
In your scenario builder, click the + sign after Module Migrator > Search scenarios module.
From the list of modules, add a Router.
Step 3: (Safe recreation) Set up the Module Migrator > Migrate outdated modules module if manual steps are needed
In this method you can create a new copy of the scenario in a designated folder and leave the original untouched. Set up the Module Migrator > Migrate outdated modules if manual steps are needed for migration.
To one end of the router, add a Module Migrator > Migrate outdated modules module. Follow the next steps to configure it as shown in the image below.
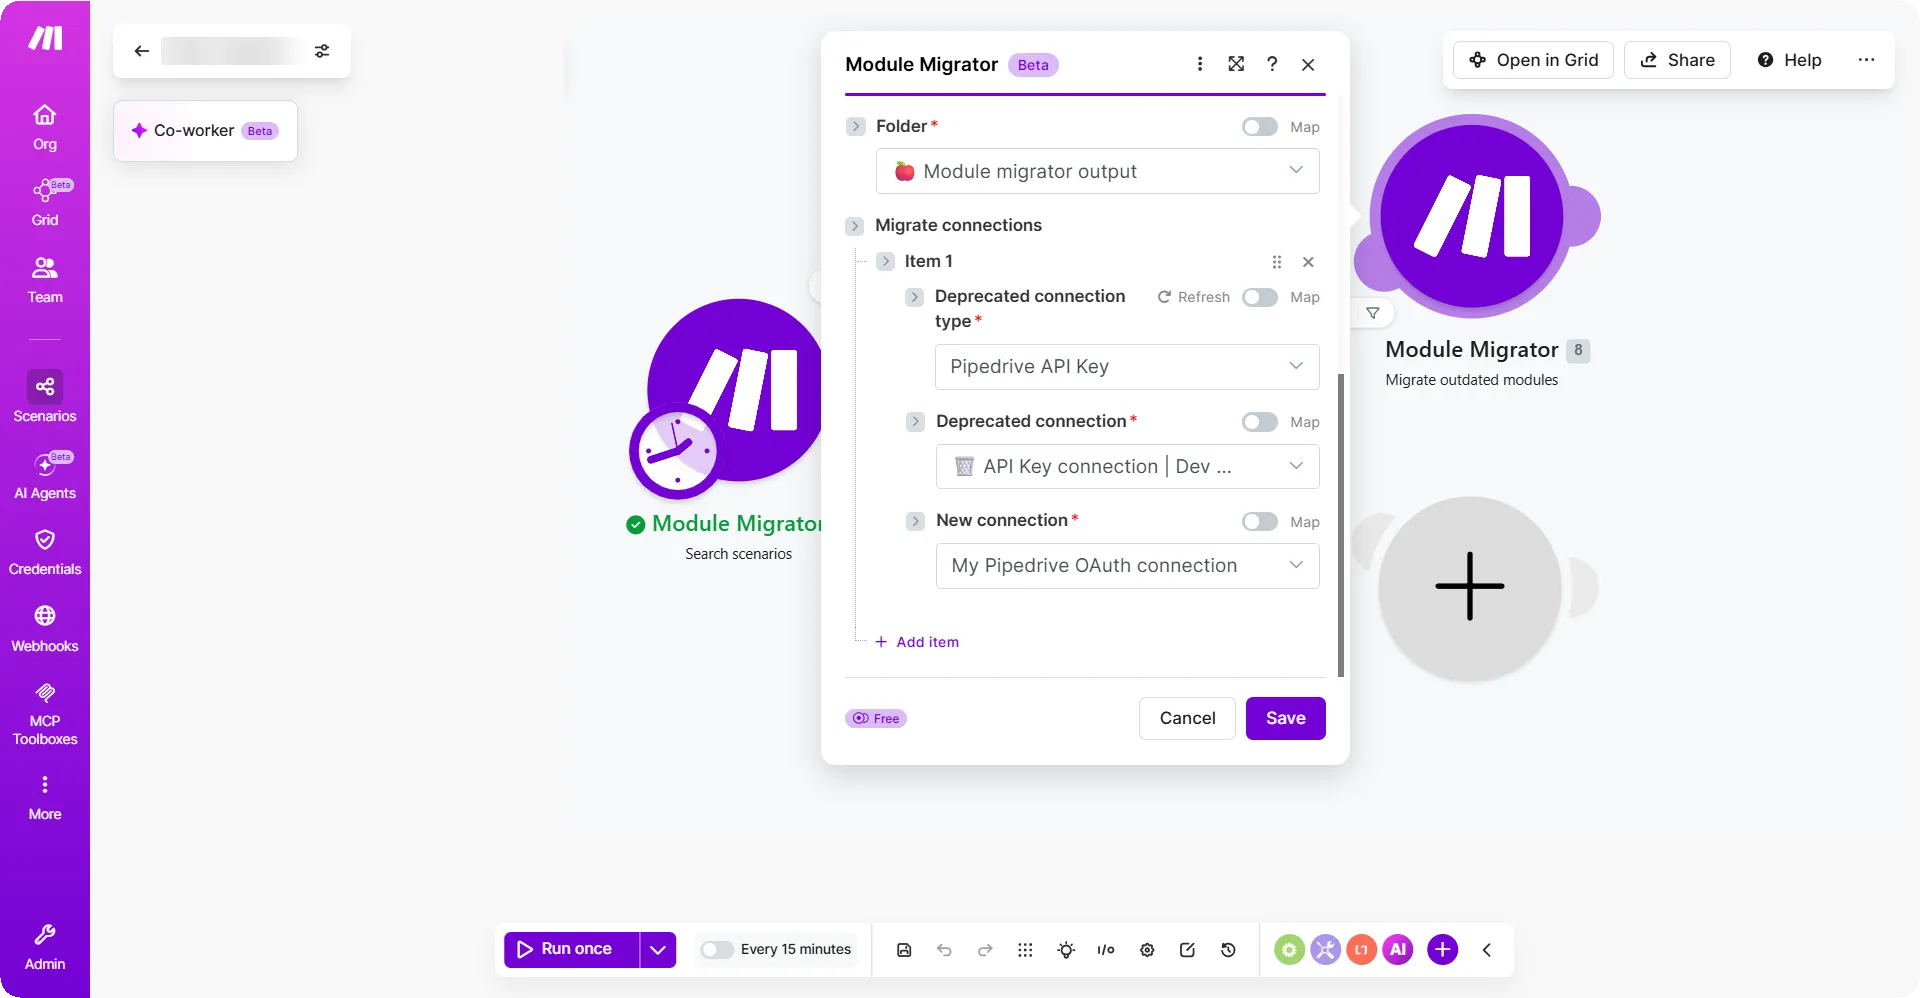
In the Connection field, select an account to connect or create a new connection using OAuth or API keys.
In the Scenario ID field, map the Scenario ID from the Module Migrator > Search scenarios module.
From the Migration mode dropdown, select Create a new scenario.
From the Folder dropdown, select the folder.
In the Deprecated connection type field, select the type of deprecated connection.
For example: Pipedrive API Key
In the Deprecated connection field, select the name of the connection.
For example: My Pipedrive API Key connection
In the New connection field, select the new type of connection.
For example: My Pipedrive OAuth connection
Click Save.
Step 4: (Direct update) Set up the Module Migrator > Migrate outdated modules module if manual steps are not needed
In this method, the system overwrites the existing scenario with the updated module versions. This type of migration is best suited for rapid batch processing of low-risk scenarios.
To the second end of the router, add another Module Migrator > Migrate outdated modules module. Follow the next steps to configure it as shown in the image below.
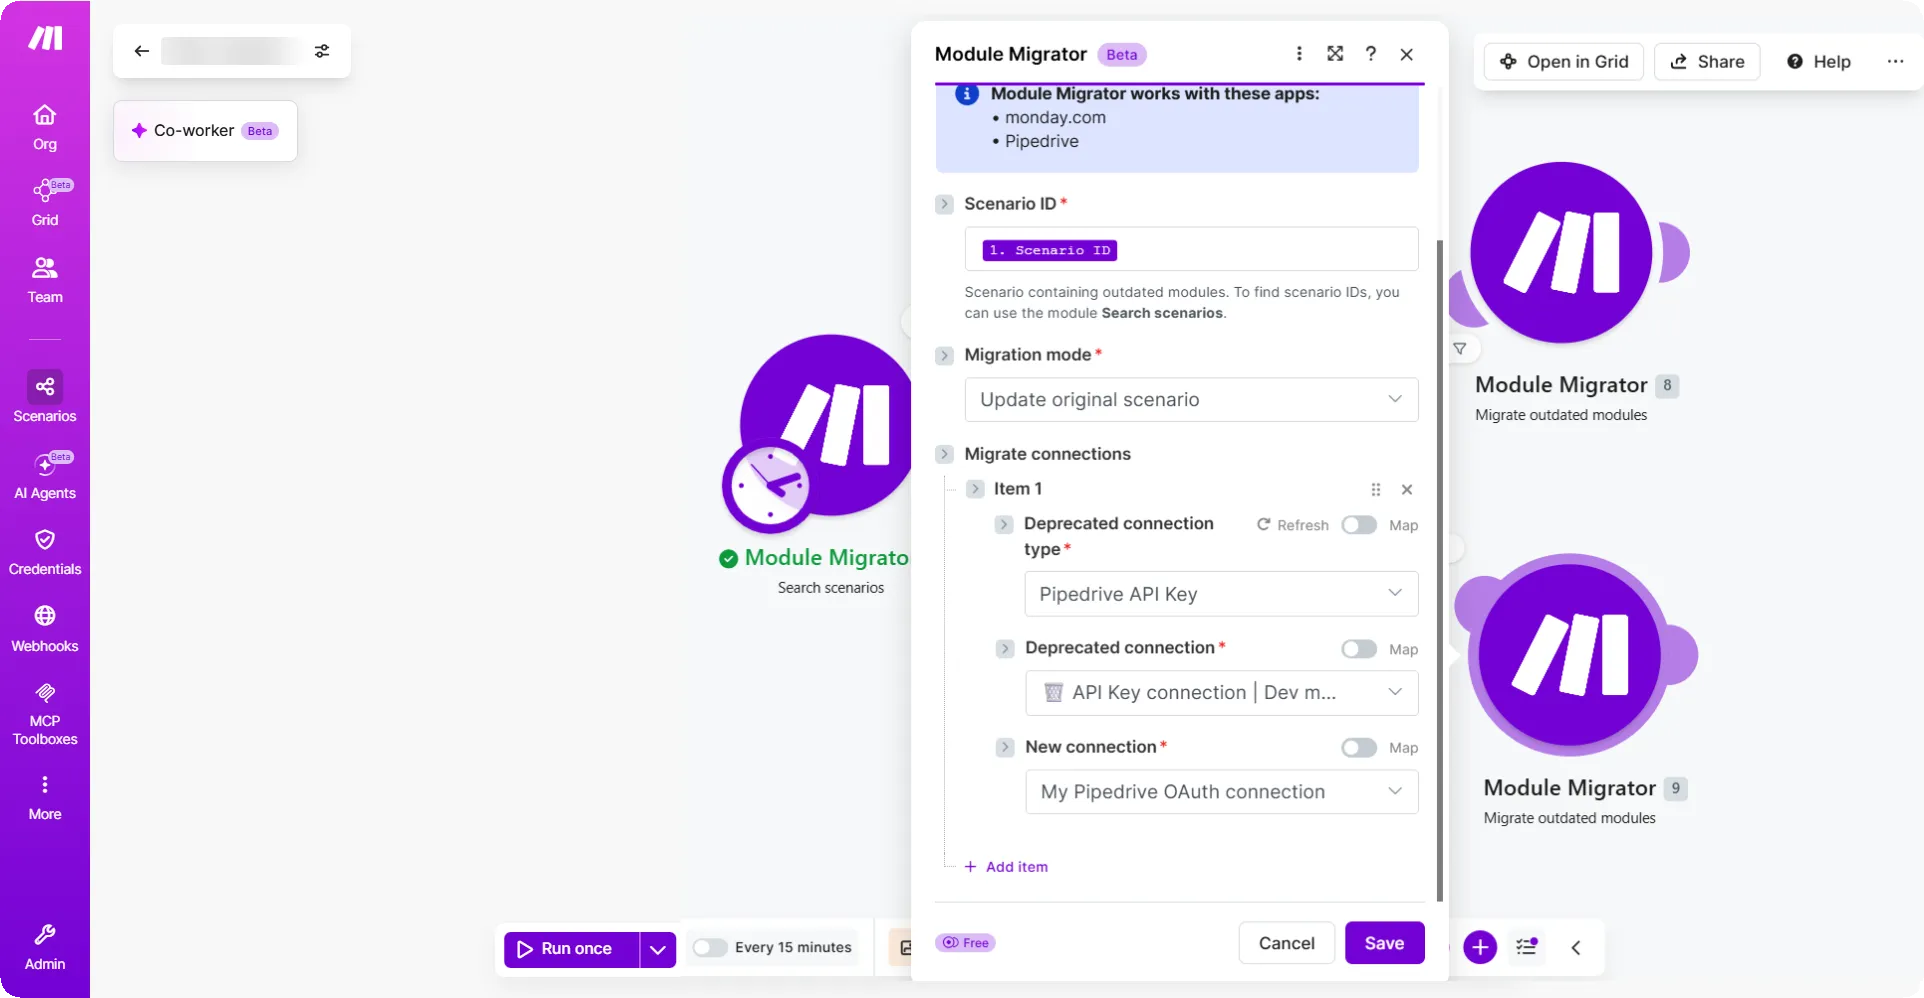
In the Connection field, select an account to connect or create a new connection using OAuth or API keys.
In the Scenario ID field, map the Scenario ID from the Module Migrator > Search scenarios module.
From the Migration mode dropdown, select Update original scenario.
In the Deprecated connection type field, select the type of deprecated connection.
For example: Pipedrive API Key
In the Deprecated connection field, select the name of the connection.
For example: My Pipedrive API Key connection
In the New connection field, select the new type of connection.
For example: My Pipedrive OAuth connection
Click Save.
Step 5: Set up filters
You can set up two filters - one filter to catch scenarios that require human intervention, the other to to automatically handle updates without manual review.
To the first route, right-click and add a filter.
In the Label field, type Create.
Select No in the Set the route as a fallback. A fallback route is a backup route that is used if the source data didn't go through any other route. One router can have only one fallback route field.
In the Condition field, map Requires manual review= true.
To the second route, right-click and add a filter.
In the Label field, type Auto.
Select Yes in the Set the route as a fallback. A fallback route is a backup route that is used if the source data didn't go through any other route. One router can have only one fallback route field.
Leave all other attributes to their default values.
Click Save.
Step 6: Run the scenario
Click Save to save the scenario.
Click Run once.
When you run the scenario, you should see the following results:
- If your scenario requires additional manual steps, it goes through the first filter - Create. Once the Migrate outdated modules module is executed, a warning bundle is returned stating that All modules were migrated, but some module settings need to be updated. To finish migrating, follow the instructions in the 'Review instructions' section below.
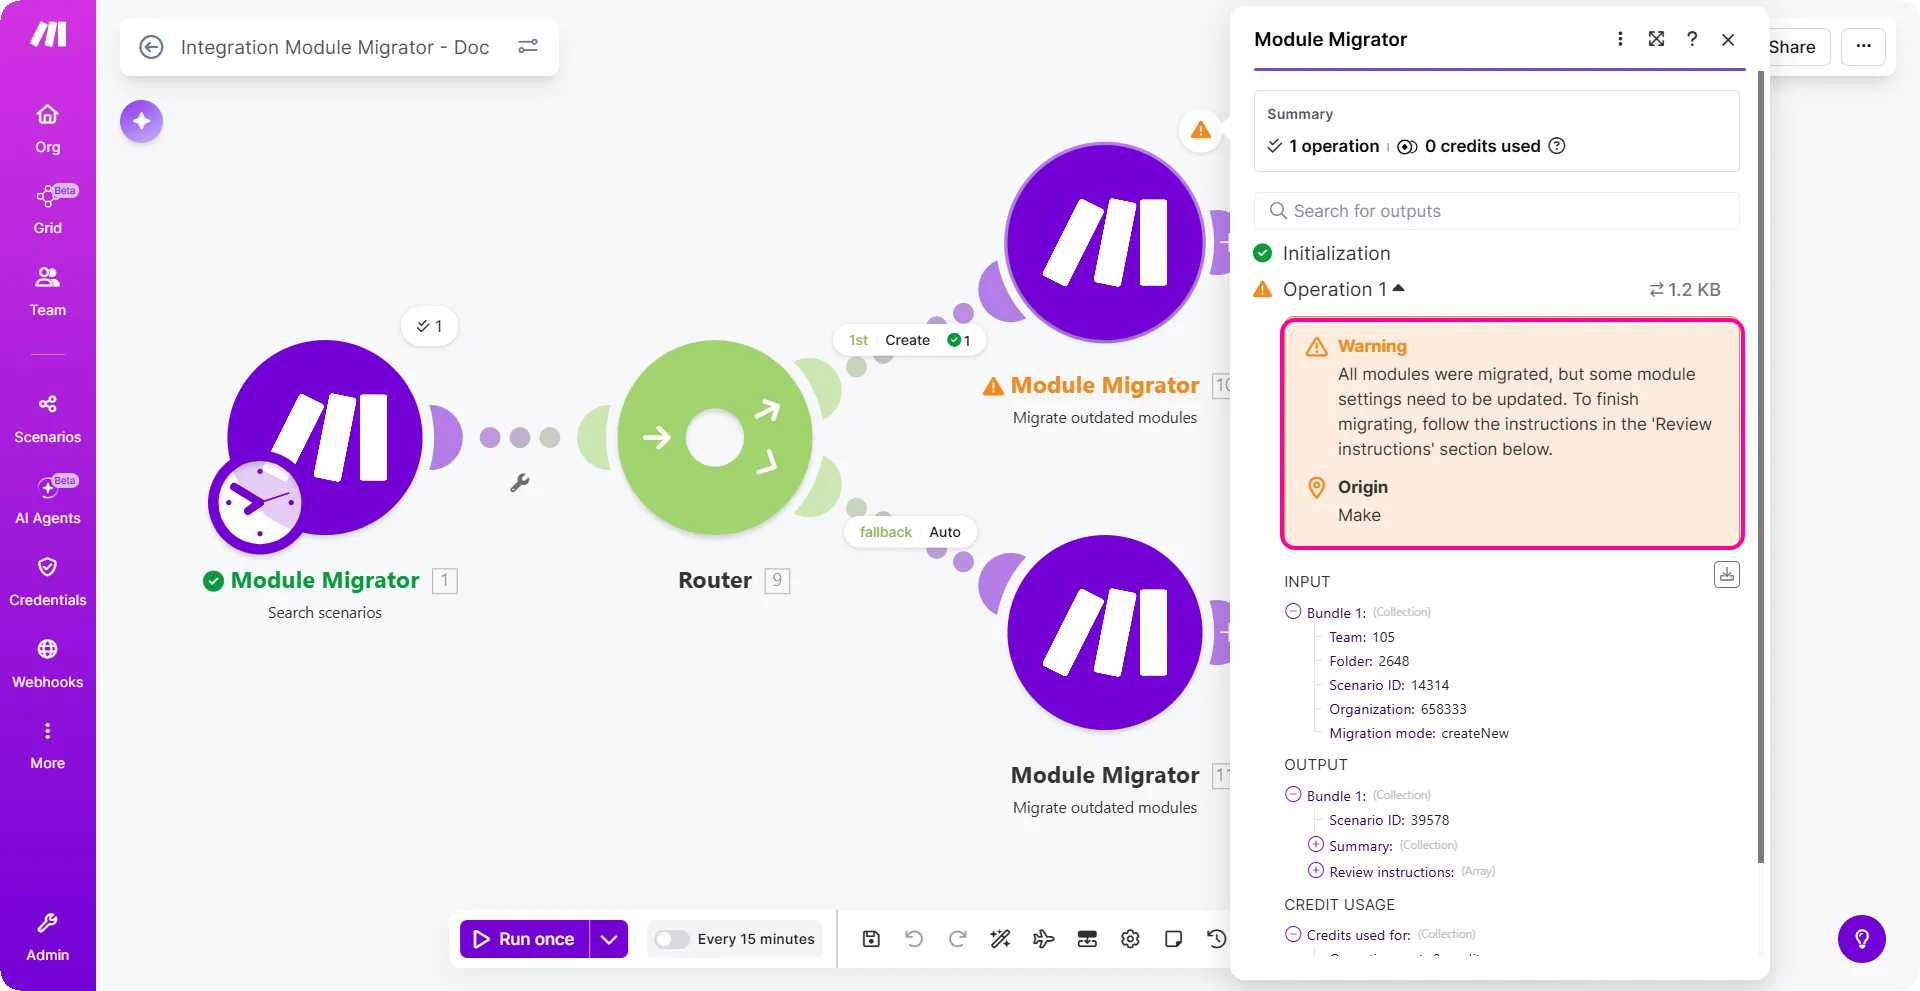
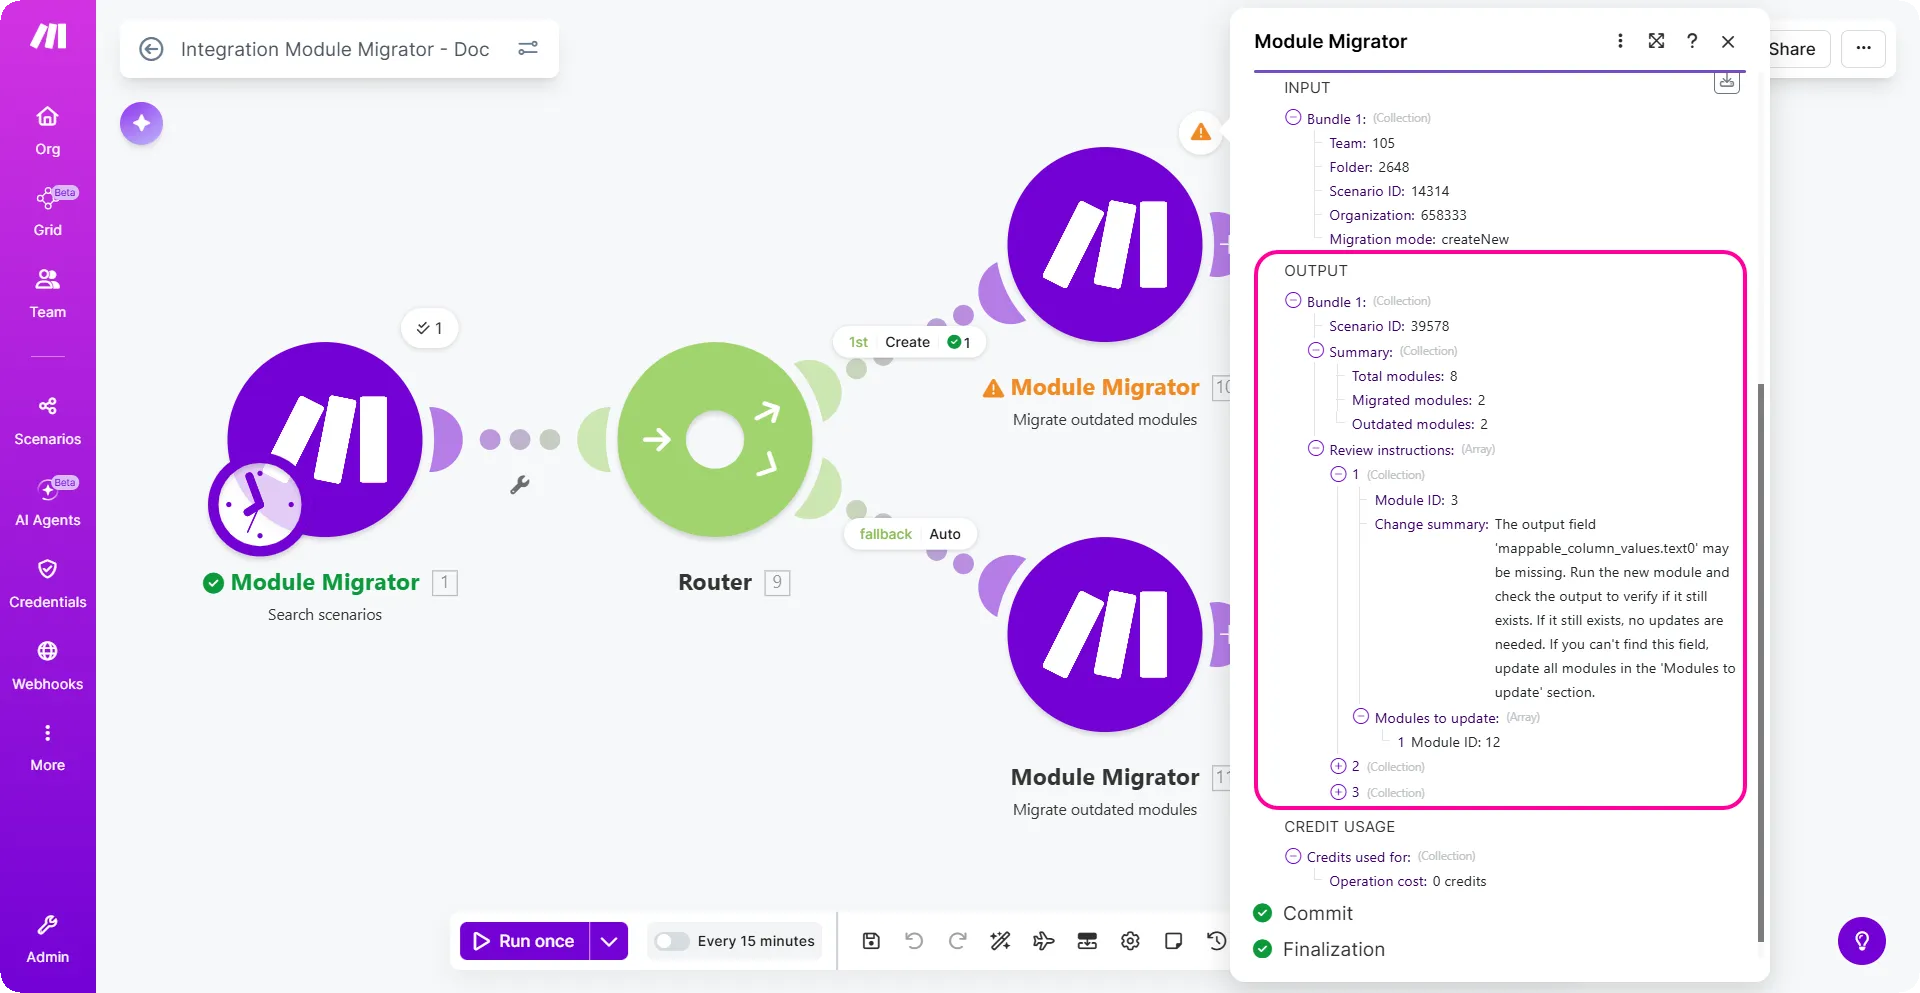
- The output bundle tells exactly which module in your scenario is impacted and instructions to complete the required updates.
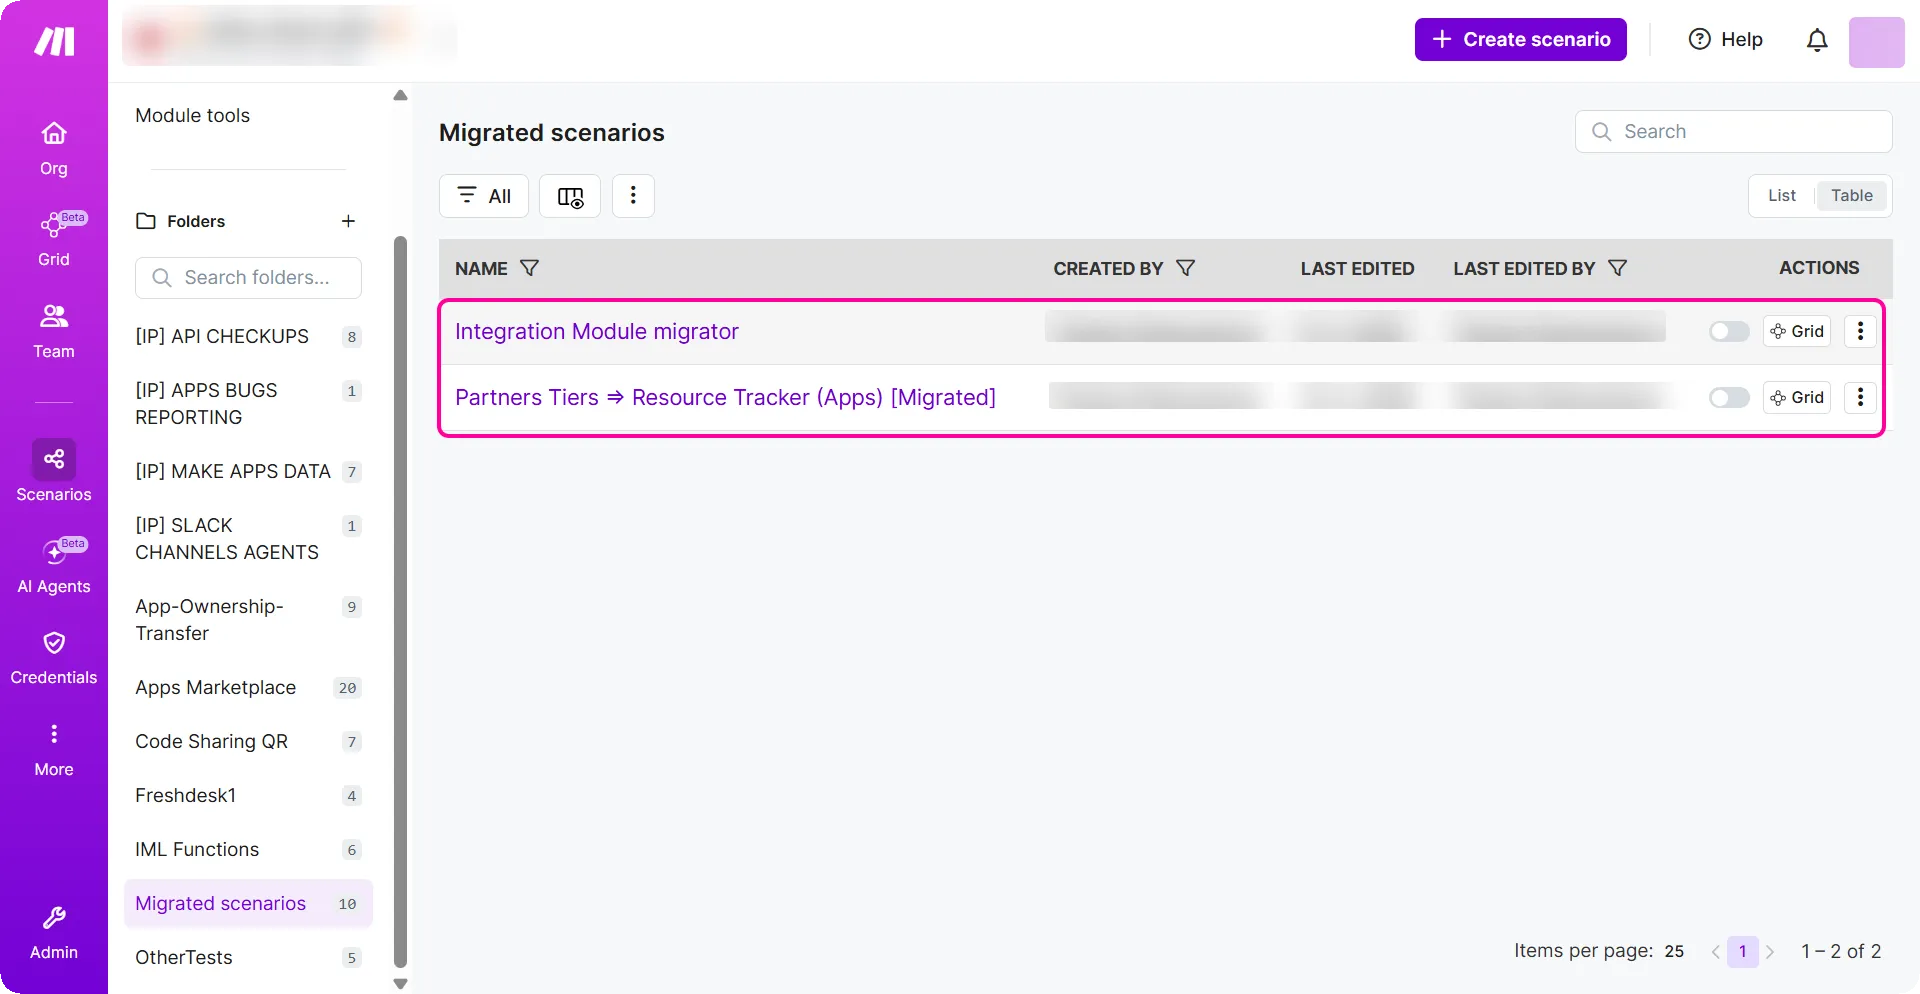
- A new duplicate scenario with the suffix [Migrated] is added to your selected folder from Step 3.
- If manual steps were not needed, the scenarios go through the second route. This path automatically handles all scenarios that were simple enough to be updated without manual review.
FAQs
The behavior of the Module Migrator depends on the Migration Mode you select. Please refer to the relevant section below.
Mode: Create new scenario
Use this mode to create a fresh copy of your scenario without affecting the original.
1. Are Webhooks carried over in this mode?
No. If your scenario starts with a Webhook, the Module Migrator will remove the connection during migration. You will need to manually reconnect or create a new Webhook in the generated scenario.
2. Does the Migrator automatically create a new webhook?
No. The Module Migrator does not automatically generate new webhook during the migration process.
3. Is the "Increment" value preserved?
No. In this mode, the Module Migrator resets the Increment module value, and it will restart from 1.
4. How can I prevent the Increment value from resetting?
- Run the migration using Create new scenario mode.
- Manually complete any remaining configuration in the new scenario.
- Test the scenario to ensure the logic is functioning correctly.
- Export the Blueprint of this new scenario.
- Import the Blueprint back into your original scenario to overwrite the logic while retaining the original module states.
Mode: Update Original Scenario
Use this mode to apply updates directly to an existing workflow.
1. Are webhooks preserved in this mode?
Yes. Because you are updating an existing scenario, the original webhooks remain intact and active.
2. Is the "Increment" value preserved?
Yes. The current state and history of your Increment modules are maintained.
3. Will this mode affect other manual settings?
Generally, no. This mode updates the module mapping and logic you have selected in modules.