Webhooks
With the Webhooks app in Make, you can create custom webhooks, custom mailhooks, and webhook responses.
Custom webhook module
Use the Custom webhook module to instantly trigger a scenario from any third-party service. This module generates a unique webhook URL that services call to send data to Make.
Each scenario uses its own webhook. You can't use the same webhook in multiple scenarios.
Create a new webhook
To create a new webhook from the Custom webhook module:
In the Scenario Builder, search for the Webhooks > Custom webhook module in the app search.
Next to the Webhook dropdown, click Add.
In Webhook name, give your webhook a unique name.
Optionally, in API Key authentication, add one or multiple API keys:
- Click + Add API key.
- Click Create a keychain.
- In Name, give your new keychain a unique name.
- In API key value, enter a key for your new keychain. It must contain ASCII characters and be no more than 512 characters. Store it in a safe place; for security reasons, you won't be able to view it afterwards.
- Click Create.
- Add additional API keys as needed.
In requests, include API keys in the x-make-apikey header.
Click Save.
You've now added a new webhook for the Custom webhook module. Make generates a URL and starts listening for requests.
Define the webhook data structure (optional)
It is recommended to define the data structure for incoming webhook requests. A data structure tells Make what values to expect from third-party services calling the webhook. Without one, Make accepts all incoming data without validation. Unexpected or invalid data won't be flagged at the webhook, and later modules that depend on that data may return errors.
You can define a webhook data structure when you create a webhook or call the webhook URL:
Method | How | When to use it |
|---|---|---|
Create a webhook | When creating a webhook, in Advanced settings > Data structure, add a new data structure or select an existing one. | You know the data values in advance and want Make to validate incoming data. |
Call the webhook | Send a test request with sample data to the webhook URL from your third-party service or Postman. | You want to see the data values available to map in later modules. |
Re-call the webhook | In the Custom webhook module settings, click Detect new values and send another test request with new sample data. | You want to change the data structure. |
If you use the calling or re-calling webhook method: Make doesn't create a reusable data structure in the Data structures section and stores the data structure internally with the webhook. Make does not validate incoming data.
Supported incoming data formats
Make supports the following incoming data formats:
- Query string
- Form data
- JSON
If a webhook receives data in both the query string and either form data or JSON data at the same time, the system combines the data into a single bundle. If the request contains duplicate data in different formats, the query string takes precedence and overwrites the data that was received in the other formats. It is not recommended to duplicate data in query strings, form data, and JSON.
Query String
GET
https://hook.make.com/yourunique32characterslongstring?name=Make&job=automate
Form Data
POST
https://hook.make.com/yourunique32characterslongstring
Content-Type: application/x-www-form-urlencoded

name=Integrobot&job=automate
Multipart
POST
https://hook.make.com/yourunique32characterslongstring
Content-Type: multipart/form-data; boundary=---generatedboundary

---generatedboundary
Content-Disposition: form-data; name="file"; filename="file.txt"
Content-Type: text/plain

Content of file.txt
---generatedboundary
Content-Disposition: form-data; name="name"
Make
---generatedboundary
In order to receive files encoded with multipart/form-data, it is necessary to configure a data structure with a collection type field that contains the nested fields name, mime and data. The field name is a text type and contains the name of the uploaded file. The mime is a text type and contains a file in the [MIME] format. The field data is a buffer type and contains binary data for the file being transferred.
JSON
POST
https://hook.make.com/yourunique32characterslongstring
Content-Type: application/json

{"name": "Integrobot", "job": "automate"}
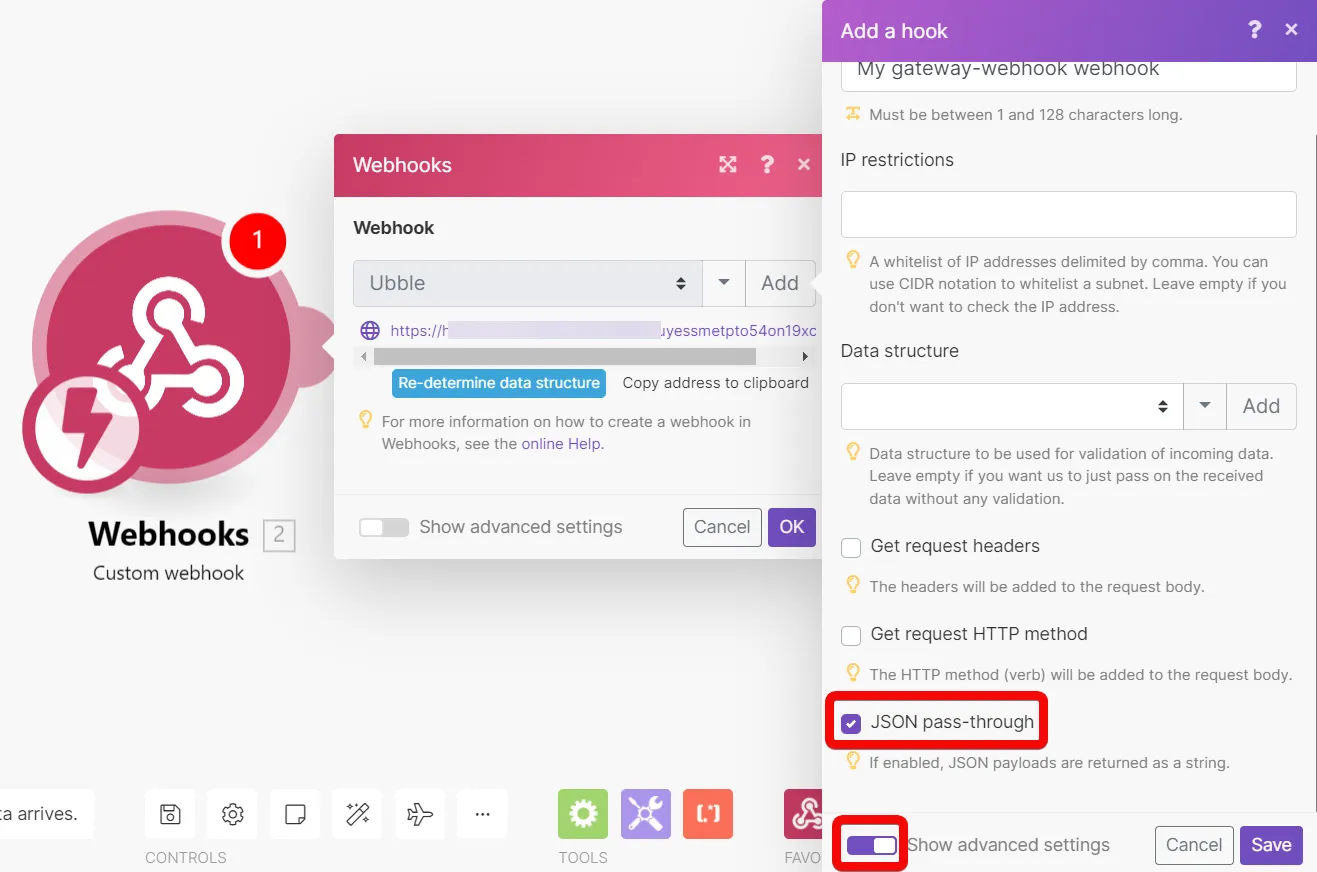
To access the original JSON, open the webhook's settings and enable the JSON pass-through option:
The maximum allowed webhook's payload size (Content-Length) is 5 MB (5.242.880 bytes) regardless of the subscription tier.
Enable webhook request headers (optional)
Optionally, to use headers from incoming webhook requests in your scenario, enable request headers:
In the Webhooks > Custom webhooks module, click Edit or Add next to Webhook.
Toggle Advanced settings.
Select Yes in Get request headers.
You've now enabled request headers.
x-make-apikey is a reserved word. If you use it, you will not receive the value as it is automatically sanitized.
Edit webhook settings
You can edit a webhook after creating it if you have a Team Admin, Team Member, or Team Restricted Member role.
To edit webhook settings:
Go to Webhooks on the left sidebar.
Click the three-dot menu next to a webhook.
Click Edit.
Edit the fields you want to change and save.
Use the table below to understand all webhook settings from the Custom webhook module.
Setting | Description |
|---|---|
API Key authentication | Provides an optional extra layer of security to control access management. For example, you can control a user's access by adding, removing, or updating API keys. |
IP restrictions | An allowed list of IP addresses delimited by comma. Only webhook requests that come from the specified IPs will be processed. Use CIDR notation to allow list a subnet. Leave empty if you want to allow requests from all IPs. |
Data structure | Select an existing data structure or create a new data structure for the webhook. Make will use the data structure to validate the incoming data. Requests that don't pass validation will be rejected with HTTP status code 400. |
Get request headers | Extracts headers data from the webhook request and makes the data available for mapping in the scenario. |
Get request HTTP method | Extracts the HTTP method from the request and makes the method available for mapping in the scenario. |
JSON pass-through | Passes JSON payloads to subsequent modules in the scenario as a text string, as opposed to breaking the payload down into mappable fields. |
The Webhook section applies only to webhooks from the Custom webhooks module.
Custom mailhook module
Custom mailhook is an instant trigger module that can be triggered by sending an email to the email address generated by this module.
The maximum size of an email, including its attachments, that you send to a mailhook is 25 MB.
Example
The Custom mailhook module monitors your incoming emails without the need to have a scheduled run of the scenario.
Add the Custom mailhook module to your scenario (Webhooks > Custom mailhook).
Click Create a webhook.
Optional: In the Webhook name, enter a name for the Webhook.
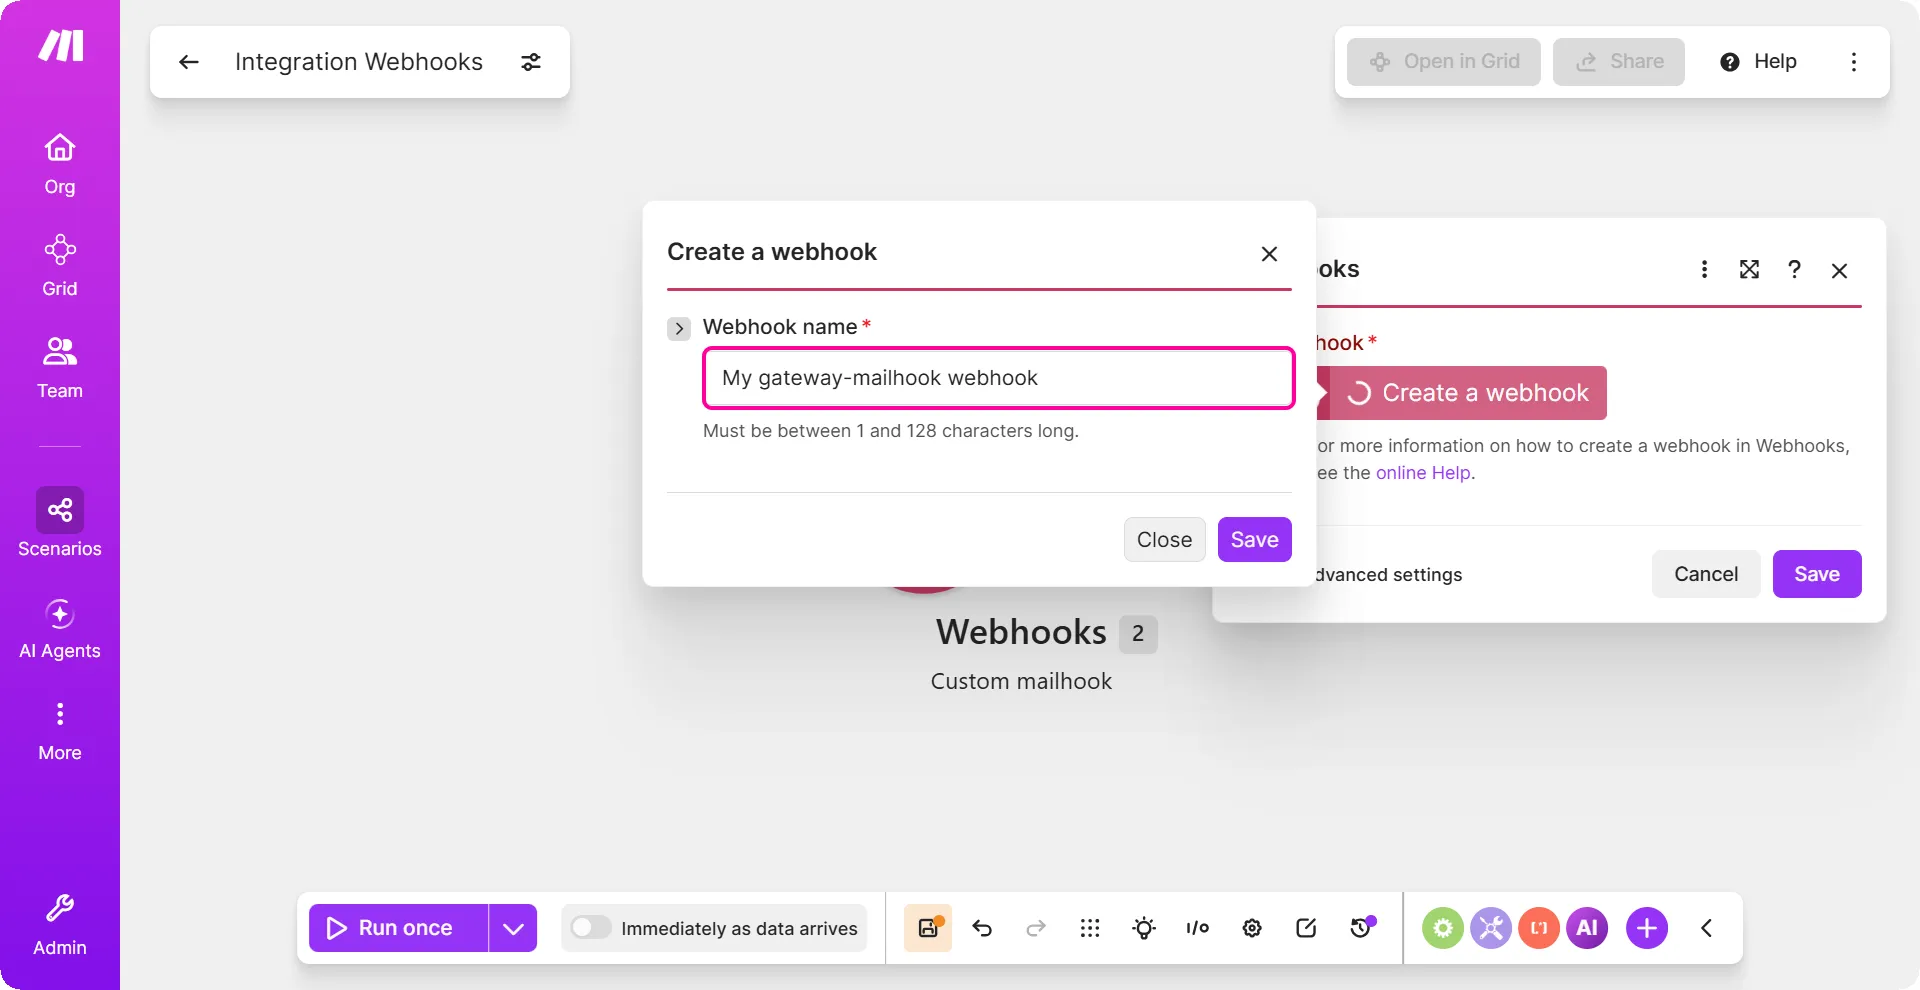
Click Save.
Copy the address to the clipboard.
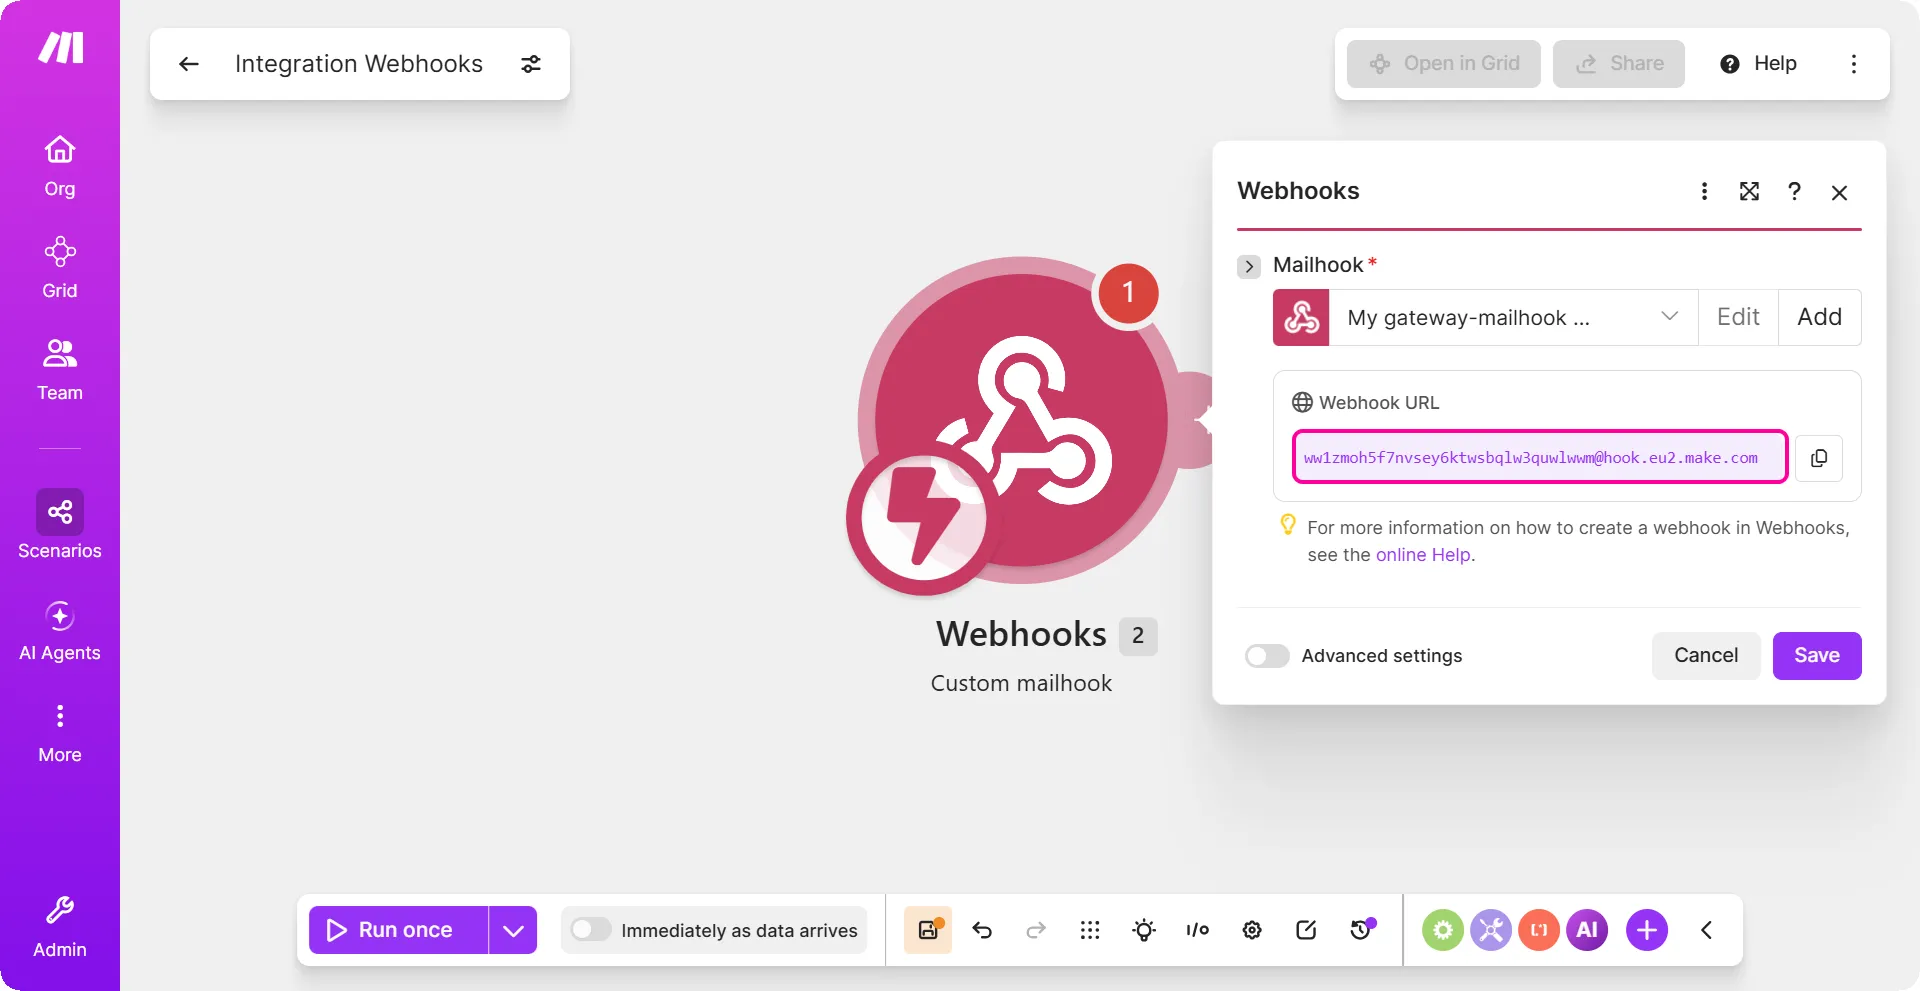
Save and run the scenario.
Open your email account settings, and configure forwarding. Use the email address generated by the Custom mailhook module in step 2 (above) as the forwarding address.
For Gmail:
Click the cogwheel in the top-right corner, and then click See all settings.
Open the Forwarding and POP/IMAP tab.

Click the Add a forwarding address button.
Enter the email address you have generated and copied in step 2 above, and click Next.
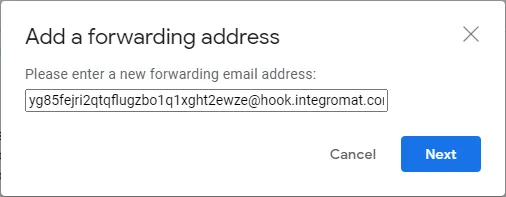
After that, a popup window will appear. Click Proceed.
A confirmation link has been sent to your mailhook. Run the custom mailhook module to see this code in the output under Bundle > Text.
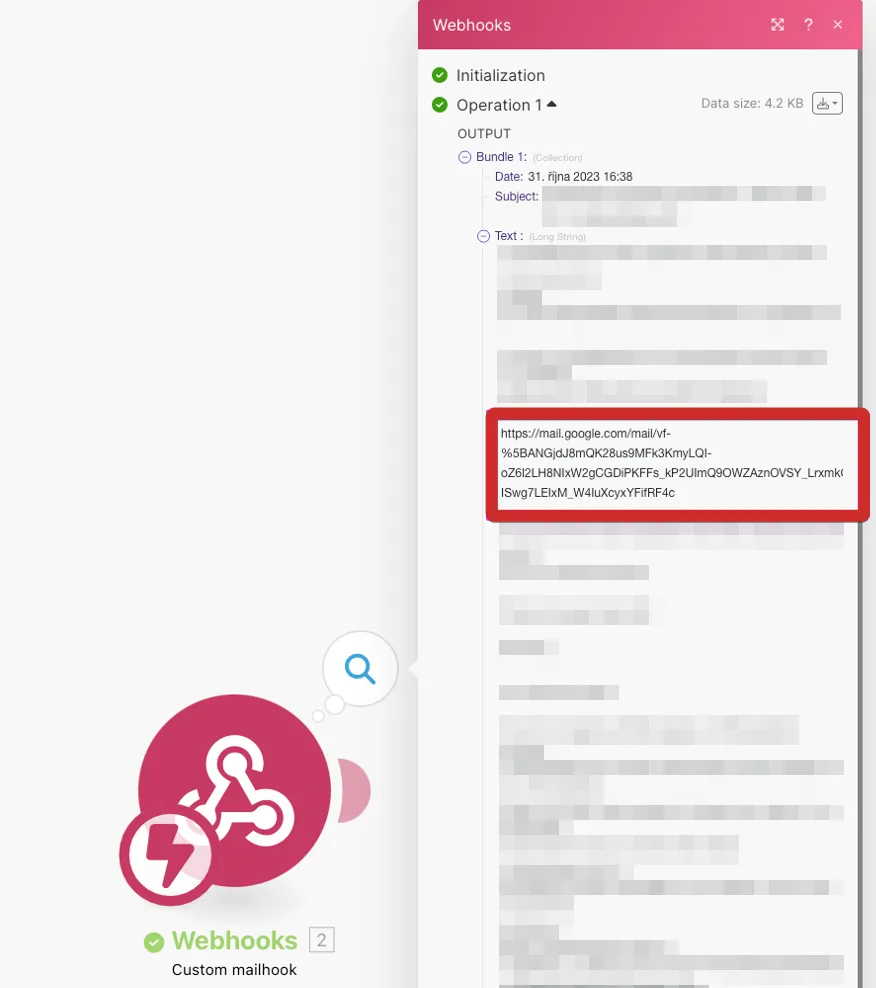
If you use Gmail for work or school, you don't need to verify the forwarding address.
Enable the forwarding, and save changes.

Add other desired modules to the scenario. Then save and activate the scenario.
Now, every time a new email is received in your email account, the Custom mailhook module in your Make scenario is triggered and receives the email message data.
The sender and various recipient addresses (To: CC: and BCC:) are resolved in the data structure of the incoming mail. Reply-To: can be found in the Header section.
Webhook response module
The default response to a webhook call contains a simple text, "Accepted." The response is returned to the webhook's caller right away during the execution of the Custom Webhook module. You can easily test it like this:
Place the Custom Webhook module in your scenario.
Add a new webhook in the module's configuration.
Copy the webhook's URL to your clipboard.
Run the scenario - the Custom Webhook module should be waiting for the webhook call (see on the right)
Open a new browser window, paste the copied URL in the address bar and press Enter.
The Custom Webhook module will be triggered and the browser will display the following page:
These are default responses when the scenario does not contain the Webhook Response module:
| HTTP status code | Body |
|---|---|---|
Webhook accepted in the queue | 200 | Accepted |
Webhook queue full | 400 | Queue is full. |
If you wish to customize the webhook's response, employ the module Webhook Response. The configuration of the module contains two fields: Status and Body. The Status field should contain HTTP response status codes like 2xx for Success (e.g.200 for OK), 3xx for Redirection (e.g.307 for Temporary Redirect), 4xx for Client errors (e.g. 400 for Bad Request), etc. The Body field should contain anything that will be accepted by the webhook's call. It can be a simple text, HTML, XML, JSON, etc. It is advisable to set the Content-Type header to the corresponding mime type: text/plain for plain text, text/html for HTML, application/json for JSON, application/xml for XML, etc.
These are additional default responses when the Make does contain the Webhook Response module:
| HTTP status code | Body |
|---|---|---|
Scenario encounters an error | 500 | Scenario failed to complete. |
The timeout for sending a response is 180 seconds. If the response is not available within that period, Make returns a '200 Accepted' status.
HTML response example
Configure the Webhook response module as follows:
Status | 2xx success HTTP status code, e.g. 200 |
|---|---|
Body | HTML code, e.g.: <!DOCTYPE html>
<html lang="en">
<head>
<meta charset="UTF-8">
<title>Thank you!</title>
</head>
<body>Thank you, {{1.name}}, for your request!
</body>
</html> |
Custom headers |
|
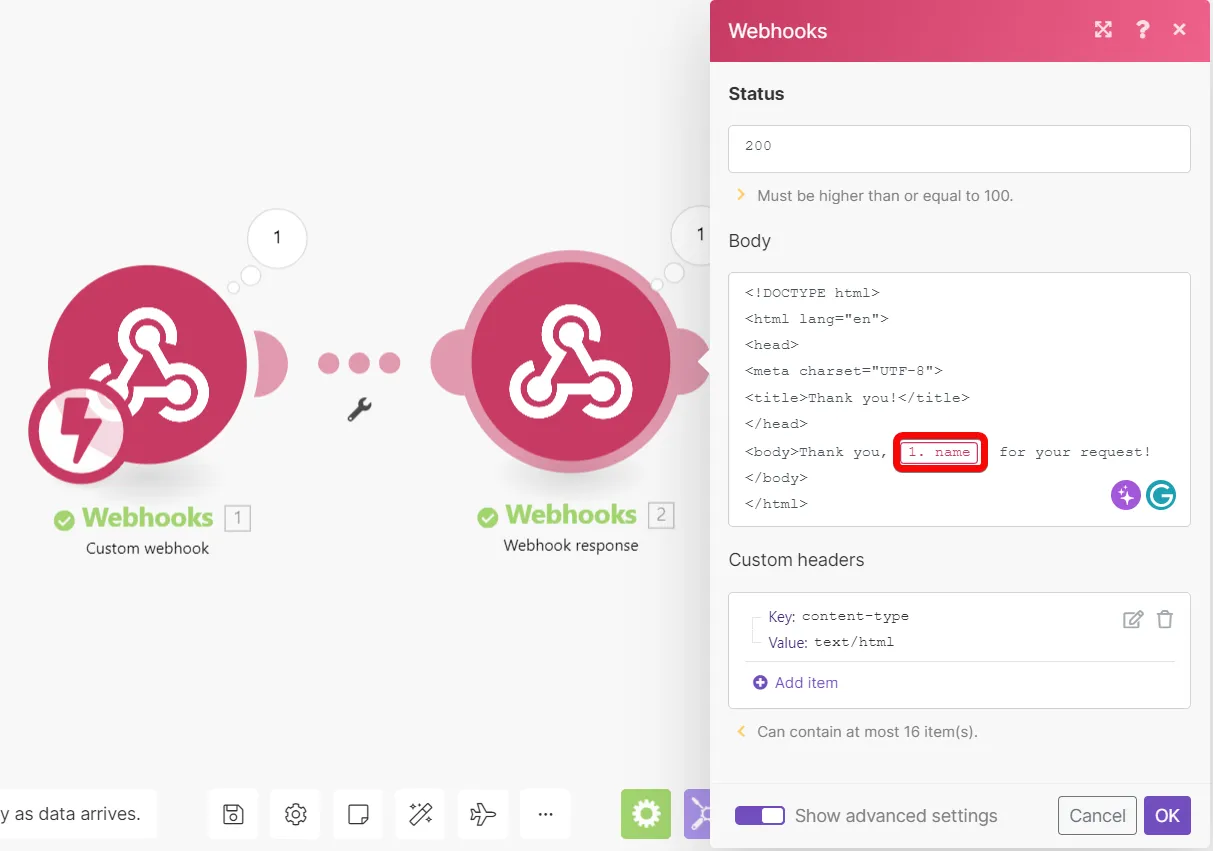
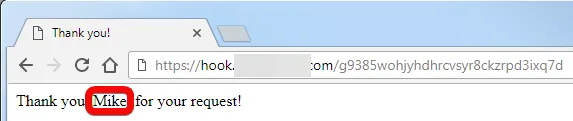
It will produce an HTML response that will be displayed like this in a web browser:
Redirect example
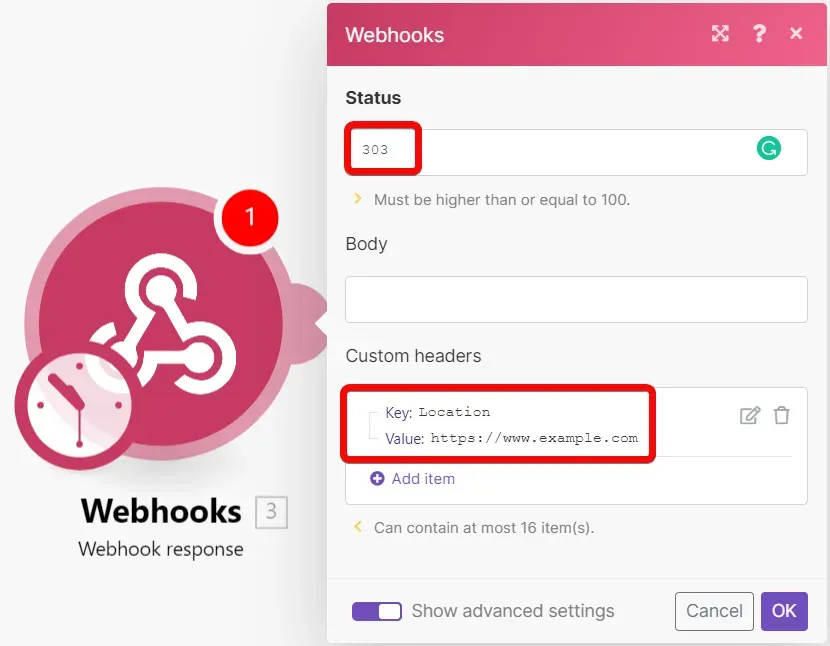
Configure the Webhook Response module as follows:
Status | 3xx redirection HTTP status code, e.g. 303 |
|---|---|
Custom headers |
|
Troubleshooting webhooks
A common problem when working with webhooks is missing some of the data values that you wanted to map in later modules. To add new values, re-determine the data structure in the Custom webhook module:
In the Scenario Builder, open the Webhooks > Custom webhook module.
Click Detect new values.
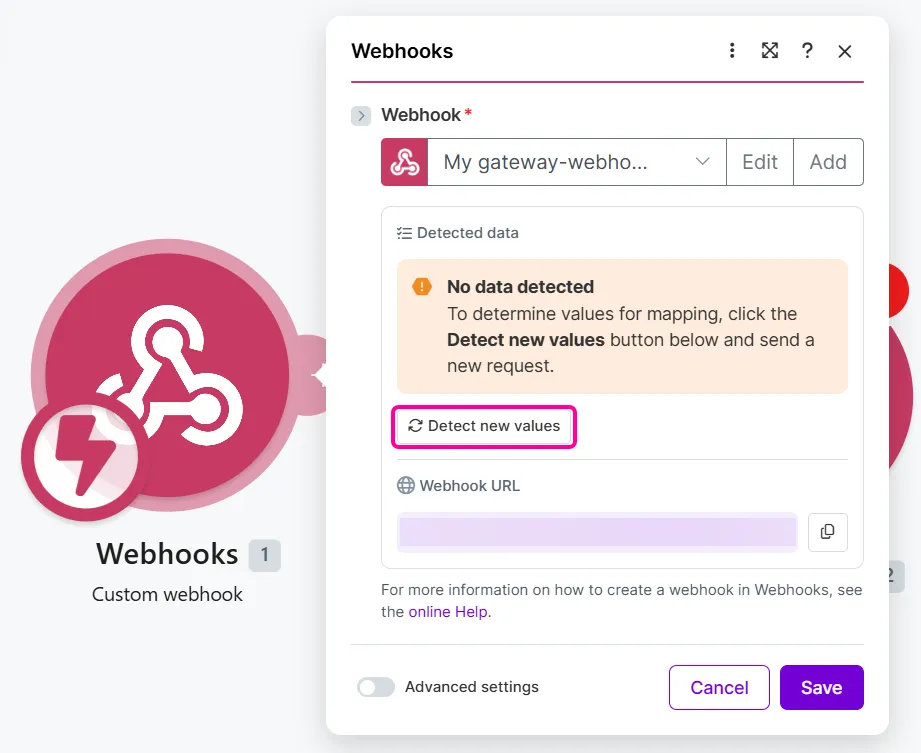
Send a request with sample data from your third-party service to the webhook URL.
You've now de-determined the data structure. The new data values that Make detected are ready to map in later modules.