Blogger

Blogger is an online content management system that enables users to create and manage blogs with time-stamped entries. The Blogger modules allow you to watch, create, delete, revert, update, and publish the posts in your Blogger account.
Requirements
In order to use Blogger with Make, it is necessary to have a Blogger account. You can login to Blogger using your Google account, you can create a google account at google.com.
Connecting the Blogger to Make
Log in to your Make account, add a Blogger module to your scenario, and click Create a connection.
If you add a module with an instant tag, click Create a Webhook, then Create a Connection.
In the Connection Name field, enter a name for the connection.
Optional: Switch on the Show advanced settings toggle and enter your Google Cloud Platform project client credentials. For more information, see the Create and configure a Google Cloud Platform project for Blogger section.
Click Sign in with Google.
You've successfully created the connection and can now use the Blogger app in your scenarios. If you want to make changes to your connection in the future, follow the steps here.
Create and configure a Google Cloud Platform project for Blogger
To connect to Make using your own client credentials, you can create and configure a project in the Google Cloud Platform.
Enable APIs for Blogger
To enable the required APIs:
Open the left navigation menu and go to APIs & Services > Library.
Search for the following API: Blogger API.
Click Blogger API, then click Enable. If you see the Manage button instead of the Enable button, you can proceed to the next step: the API is already enabled.
Configure your OAuth consent screen for Blogger
To configure your OAuth consent screen:
In the left sidebar, click Google Auth Platform.
If you don't see Google Auth Platform in the left sidebar, click View all products at the top of it, then pin Google Auth Platform to the sidebar.

Click Get Started.
In the Overview section, under App information, enter Make as the app name and provide your Gmail address. Click Next.
Under Audience, select External. Click Next.
For more information regarding user types, refer to Google's Exceptions to verification requirements documentation.
Under Contact Information, enter your Gmail address and click Next.
Under Finish, agree to the Google User Data Policy.
Click Continue > Create.
Click Create OAuth Client.
In the Branding section, under Authorized domains, add make.com and integromat.com. Click Save.
Optional: In the Audience section, add your Gmail address on the Test users page, then click Save and continue if you want the project to remain in the Testing publishing status. Read the note below to learn more about the publishing status.
In the Data Access section, click Add or remove scopes, add the following scopes:
https://www.googleapis.com/auth/userinfo.email
https://www.googleapis.com/auth/blogger
You can add scopes using:
- A table with filters
- A window to manually enter scopes:
Click Update.
Click Save.
Create your Blogger client credentials
To create your client credentials:
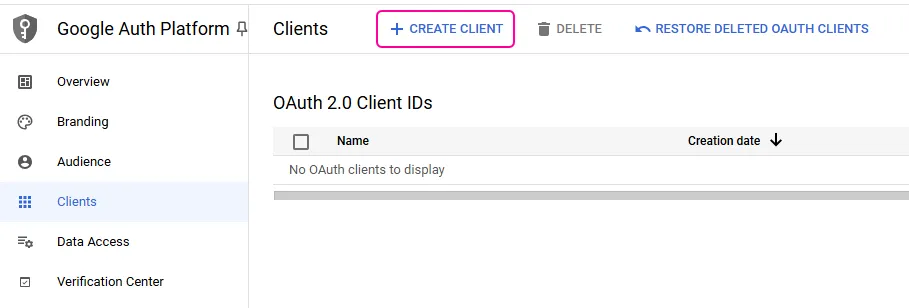
In Google Auth Platform, click Clients.
Click + Create Client.
In the Application type dropdown, select Web application.
Update the Name of your OAuth client. This will help you identify it in the platform.
In the Authorized redirect URIs section, click + Add URI and enter the following redirect URI:
https://www.integromat.com/oauth/cb/google/
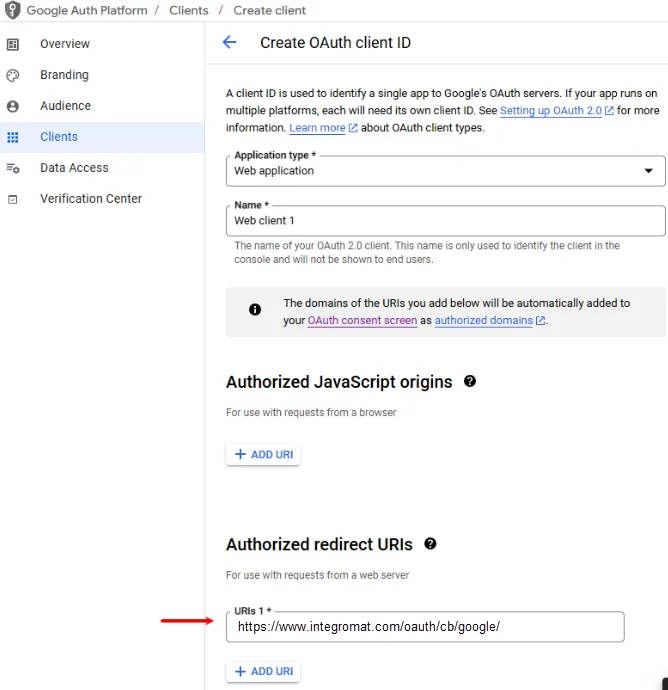
Click Create.
Click the OAuth 2.0 Client you created, copy your Client ID and Client secret values, and store them in a safe place.
You will use these values in the Client ID and Client Secret fields in Make.
Triggers
Watch Posts
Triggers when a new post is added or an existing post is updated.
Connection | |
|---|---|
Blog | Select the blog where you want to create the post. |
Status | Select the status of the post:
|
Limit | Enter the maximum number of posts Make should return during one scenario execution cycle. |
Actions
Create a Post
Creates and publishes a new post or creates a new post as a draft.
Connection | |
|---|---|
Blog | Select the blog where you want to create the post. |
Title | Enter a name for the post. |
Content | Enter the post content. |
Status | Select the status of the post:
|
Date Published | Enter the date and time when this post was published. |
Labels | Enter the labels when the post was published. |
Name | Enter the name for the post to geotag with a location. |
Latitude | Enter the latitude of the location. |
Longitude | Enter the longitude of the location. |
Span | Enter the span details for the location's viewport. |
Delete a Post
Permanently removes a post (the deleted post cannot be restored anymore).
Connection | |
|---|---|
Blog | Select the blog where you want to create the post. |
Post ID | Enter the Post ID you want to delete. |
Publish a Post
Publishes a draft post.
Connection | |
|---|---|
Blog | Select the blog where you want to create the post. |
Post ID | Enter the Post ID you want to publish. |
Revert a Post
Reverts a published post to draft state.
Connection | |
|---|---|
Blog | Select the blog where you want to create the post. |
Post ID | Enter the Post ID you want to revert. |
Update a Post
Updates a published post.
Connection | |
|---|---|
Blog | Select the blog where you want to create the post. |
Post ID | Enter the Post ID you want to update. |
Title | Enter a name for the post. |
Content | Enter the post content. |
Status | Select the status of the post:
|
Date Published | Enter the date and time when this post was published. |
Labels | Enter the labels when the post was published. |
Name | Enter the name for the post to geotag with a location. |
Latitude | Enter the latitude of the location. |
Longitude | Enter the longitude of the location. |
Span | Enter the span details for the location's viewport. |
Possible problems
Unable to update a post
The Update a post action does not allow to edit a draft (a post that's in progress). You can only update published posts.
The Watch posts trigger failed to download a post
The Blogger interface enables to download posts only assigned to one specific status. Blogger distinguishes three post statuses:
- Post in progress (draft status)
- Published post (live status)
- Scheduled post (scheduled status)
If you'd like to monitor posts in more statuses, you'll need to create a separate scenario for each status.